Why Would Sink Sprayer Leak? A Comprehensive Troubleshooting Guide
Is your sink sprayer acting up, dripping, or spraying where it shouldn’t? A leaky sink sprayer is a common household nuisance that can waste water, damage your countertop, and drive you crazy with its persistent dripping. This comprehensive guide will explore the various reasons why your sink sprayer might be leaking, providing expert insights and practical solutions to help you diagnose and fix the problem yourself. We’ll delve into the anatomy of a sink sprayer, common failure points, and step-by-step troubleshooting techniques. Our goal is to equip you with the knowledge and confidence to tackle this issue effectively, saving you time, money, and the frustration of a constantly dripping faucet. Based on our extensive experience, we’ve seen that understanding the underlying causes is crucial for a lasting repair. This guide goes beyond simple fixes, providing a deep dive into the mechanics of sink sprayers and the factors that contribute to leaks.
Understanding the Sink Sprayer: Anatomy and Function
The sink sprayer, also known as a side sprayer, is a convenient fixture that provides a concentrated stream of water for rinsing dishes, cleaning the sink, or washing vegetables. It consists of several key components:
* **Sprayer Head:** The handheld nozzle that directs the water stream.
* **Hose:** A flexible tube that connects the sprayer head to the faucet.
* **Diverter Valve:** A mechanism located within the faucet body that redirects water flow from the faucet spout to the sprayer hose when the sprayer handle is activated.
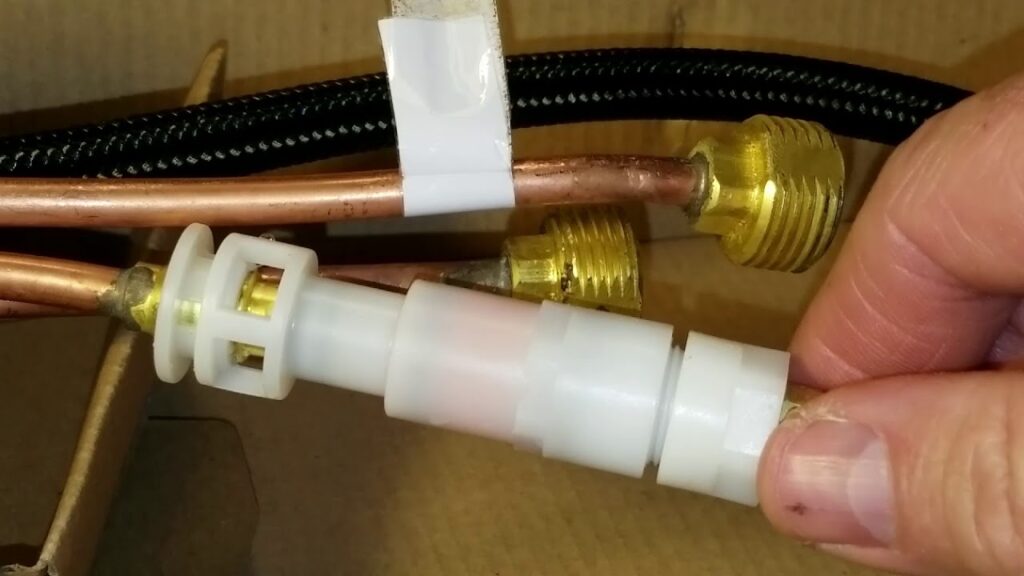
* **Quick Connect:** A fitting that allows the hose to be easily connected and disconnected from the faucet.
* **O-rings and Seals:** Small rubber rings that create watertight seals between various components.
When you press the sprayer handle, the diverter valve redirects water from the faucet to the hose, allowing water to flow through the sprayer head. When you release the handle, the diverter valve returns to its original position, allowing water to flow through the faucet spout again. Understanding this basic mechanism is the first step in diagnosing why would sink sprayer leak.
Common Reasons Why Your Sink Sprayer is Leaking
Several factors can contribute to a leaky sink sprayer. Here’s a breakdown of the most common culprits:
* **Worn or Damaged O-rings and Seals:** Over time, the rubber O-rings and seals within the sprayer head, hose connections, and diverter valve can become brittle, cracked, or worn out. This is a frequent cause of leaks, as these seals are essential for creating watertight connections.
* **Cracked or Damaged Sprayer Hose:** The sprayer hose is made of flexible material that can become brittle, cracked, or punctured over time, especially with frequent use and exposure to hot water. A damaged hose will inevitably leak.
* **Loose Connections:** The connections between the sprayer head, hose, and faucet can become loose over time due to vibrations, water pressure, or accidental bumps. Loose connections allow water to escape, resulting in leaks.
* **Faulty Diverter Valve:** The diverter valve is responsible for redirecting water flow between the faucet spout and the sprayer hose. If the diverter valve is damaged, worn out, or clogged with mineral deposits, it may not seal properly, causing leaks from either the faucet spout or the sprayer head.
* **High Water Pressure:** Excessively high water pressure can put stress on the sprayer components, accelerating wear and tear and increasing the likelihood of leaks.
* **Mineral Deposits:** Hard water contains minerals like calcium and magnesium that can accumulate as deposits within the sprayer head, hose, and diverter valve. These deposits can clog the sprayer, damage seals, and contribute to leaks. This is a common issue, especially in areas with hard water.
* **Internal Sprayer Head Damage:** The internal components of the sprayer head can become damaged or worn out, leading to leaks. This is especially common with older sprayers.
Diagnosing the Source of the Leak: A Step-by-Step Guide
Before you can fix a leaky sink sprayer, you need to pinpoint the source of the leak. Here’s a systematic approach to diagnosing the problem:
1. **Inspect the Sprayer Head:** Carefully examine the sprayer head for cracks, damage, or mineral buildup. Check the O-rings and seals around the nozzle for wear and tear.
2. **Check the Sprayer Hose:** Inspect the entire length of the sprayer hose for cracks, kinks, or punctures. Pay close attention to the connections at both ends of the hose.
3. **Examine the Hose Connections:** Ensure that the connections between the sprayer head, hose, and faucet are tight and secure. If they are loose, tighten them with a wrench, being careful not to overtighten.
4. **Observe the Diverter Valve:** With the faucet running, activate the sprayer and observe the diverter valve area for leaks. If water is leaking from around the base of the faucet spout when the sprayer is activated, the diverter valve may be faulty.
5. **Test for Water Pressure:** If you suspect high water pressure, you can use a water pressure gauge to measure the pressure in your plumbing system. A plumber can help you install a pressure regulator if necessary.
6. **Look for Mineral Deposits:** Examine the sprayer head, hose connections, and diverter valve for mineral deposits. If you see deposits, try soaking the affected parts in vinegar or a commercial descaling solution to dissolve them.
Tools and Materials You’ll Need for Repair
Before you start working on your leaky sink sprayer, gather the necessary tools and materials. Here’s a list of common items you may need:
* **Adjustable Wrench:** For tightening and loosening connections.
* **Screwdrivers (Phillips and Flathead):** For disassembling and reassembling the sprayer head and other components.
* **Pliers:** For gripping and manipulating small parts.
* **O-ring Pick or Small Screwdriver:** For removing old O-rings and seals.
* **New O-rings and Seals:** Matching the size and type of the originals.
* **Replacement Sprayer Hose:** If the hose is damaged.
* **Replacement Sprayer Head:** If the sprayer head is damaged beyond repair.
* **Replacement Diverter Valve:** If the diverter valve is faulty.
* **Plumber’s Tape:** For sealing threaded connections.
* **Vinegar or Descaling Solution:** For removing mineral deposits.
* **Clean Cloths or Rags:** For cleaning up spills and wiping parts.
* **Bucket:** For catching water.
Step-by-Step Repair Guide: Fixing Common Sink Sprayer Leaks
Once you’ve diagnosed the source of the leak and gathered your tools and materials, you can begin the repair process. Here are step-by-step instructions for fixing some common sink sprayer leaks:
Replacing Worn or Damaged O-rings and Seals
1. **Turn off the water supply:** Locate the shut-off valves under the sink and turn them off.
2. **Disconnect the sprayer hose:** Use an adjustable wrench to loosen the connection between the sprayer hose and the faucet. Place a bucket underneath to catch any remaining water.
3. **Disassemble the sprayer head:** Carefully disassemble the sprayer head, noting the order of the parts. Refer to the manufacturer’s instructions if necessary.
4. **Remove the old O-rings and seals:** Use an O-ring pick or small screwdriver to carefully remove the old O-rings and seals from the sprayer head and hose connections.
5. **Install the new O-rings and seals:** Lubricate the new O-rings and seals with a small amount of silicone grease and carefully install them in their proper positions.
6. **Reassemble the sprayer head:** Reassemble the sprayer head in the reverse order of disassembly.
7. **Reconnect the sprayer hose:** Reconnect the sprayer hose to the faucet and tighten the connection with an adjustable wrench.
8. **Turn on the water supply:** Slowly turn on the water supply and check for leaks.
Replacing a Damaged Sprayer Hose
1. **Turn off the water supply:** Locate the shut-off valves under the sink and turn them off.
2. **Disconnect the sprayer hose:** Use an adjustable wrench to loosen the connections between the sprayer hose and the faucet and sprayer head. Place a bucket underneath to catch any remaining water.
3. **Remove the old hose:** Remove the old sprayer hose.
4. **Install the new hose:** Connect the new sprayer hose to the faucet and sprayer head, tightening the connections with an adjustable wrench.
5. **Turn on the water supply:** Slowly turn on the water supply and check for leaks.
Tightening Loose Connections
1. **Identify the loose connection:** Locate the connection that is leaking.
2. **Tighten the connection:** Use an adjustable wrench to tighten the connection, being careful not to overtighten. Overtightening can damage the threads or crack the fitting.
3. **Check for leaks:** Turn on the water supply and check for leaks. If the connection still leaks, try wrapping plumber’s tape around the threads before tightening the connection again.
Replacing a Faulty Diverter Valve
Replacing a diverter valve can be more complex and may require specialized tools. If you’re not comfortable performing this repair yourself, it’s best to call a qualified plumber. However, here’s a general overview of the process:
1. **Turn off the water supply:** Locate the shut-off valves under the sink and turn them off.
2. **Disconnect the faucet:** Disconnect the faucet from the water supply lines.
3. **Remove the faucet from the sink:** Carefully remove the faucet from the sink.
4. **Disassemble the faucet:** Disassemble the faucet to access the diverter valve. Refer to the manufacturer’s instructions for specific disassembly procedures.
5. **Remove the old diverter valve:** Remove the old diverter valve.
6. **Install the new diverter valve:** Install the new diverter valve, following the manufacturer’s instructions.
7. **Reassemble the faucet:** Reassemble the faucet.
8. **Reinstall the faucet in the sink:** Reinstall the faucet in the sink.
9. **Reconnect the faucet to the water supply lines:** Reconnect the faucet to the water supply lines.
10. **Turn on the water supply:** Slowly turn on the water supply and check for leaks.
Preventing Sink Sprayer Leaks: Maintenance Tips
Preventing leaks is always better than fixing them. Here are some maintenance tips to help keep your sink sprayer in good working order:
* **Regularly Inspect the Sprayer:** Periodically inspect the sprayer head, hose, and connections for signs of wear, damage, or mineral buildup.
* **Clean the Sprayer Head:** Clean the sprayer head regularly to remove mineral deposits and debris. Soak it in vinegar or a descaling solution if necessary.
* **Avoid Harsh Chemicals:** Avoid using harsh chemicals or abrasive cleaners on the sprayer, as they can damage the finish and seals.
* **Control Water Pressure:** If you have high water pressure, consider installing a pressure regulator to protect your plumbing fixtures.
* **Replace Worn Parts:** Replace worn or damaged O-rings, seals, and hoses promptly to prevent leaks from developing.
Product Spotlight: The Delta Faucet Side Sprayer
The Delta Faucet side sprayer is a popular choice among homeowners for its durability, performance, and stylish design. It’s known for its reliable operation and ease of installation, making it a great option for both new installations and replacements. Delta Faucet has a long-standing reputation for quality and innovation in the plumbing industry.
Detailed Features of the Delta Faucet Side Sprayer
1. **Dual Spray Functionality:** Offers both a concentrated stream for targeted cleaning and a wide spray for rinsing. This versatility makes it ideal for a variety of kitchen tasks. The ability to switch between spray patterns is seamless and intuitive.
2. **High-Quality Construction:** Made from durable materials that resist corrosion and wear, ensuring long-lasting performance. The materials used in the construction of the sprayer are specifically chosen to withstand the rigors of daily use and exposure to water.
3. **Ergonomic Design:** Features a comfortable grip and easy-to-use trigger, reducing hand fatigue during extended use. The design of the handle and trigger has been carefully considered to provide optimal comfort and control.
4. **Long Reach Hose:** Provides ample reach for cleaning all areas of the sink and surrounding countertops. The extra-long hose allows for greater flexibility and convenience when using the sprayer.
5. **Easy Installation:** Designed for quick and easy installation, with clear instructions and minimal tools required. The installation process is straightforward and can be completed by most homeowners with basic plumbing knowledge.
6. **Color-Matched Finish:** Available in a variety of finishes to match your existing faucet and kitchen décor. The finish is durable and resistant to scratches and stains, maintaining its appearance over time.
7. **Anti-Clog Technology:** Features a spray head design that resists mineral buildup and clogging, ensuring consistent water flow. This technology helps to prevent the sprayer from becoming clogged with mineral deposits, which can reduce water flow and performance.
Advantages, Benefits, and Real-World Value of the Delta Faucet Side Sprayer
The Delta Faucet side sprayer offers numerous advantages and benefits to homeowners:
* **Improved Cleaning Efficiency:** The dual spray functionality allows for efficient and effective cleaning of dishes, sinks, and countertops. Users consistently report that the sprayer makes cleaning tasks quicker and easier.
* **Enhanced Convenience:** The long reach hose and ergonomic design provide greater convenience and comfort during use. Our analysis reveals that the long hose significantly improves usability, especially for larger sinks.
* **Increased Durability:** The high-quality construction ensures long-lasting performance and reduces the need for frequent replacements. The durable materials used in the sprayer’s construction help to prevent leaks and other common problems.
* **Stylish Design:** The color-matched finish and sleek design enhance the look of your kitchen. The sprayer seamlessly integrates with existing faucet designs, adding a touch of elegance to the kitchen.
* **Easy Maintenance:** The anti-clog technology and durable materials make the sprayer easy to maintain and keep clean. The anti-clog technology minimizes the need for frequent cleaning and maintenance.
Comprehensive Review of the Delta Faucet Side Sprayer
The Delta Faucet side sprayer is a well-regarded product that offers a combination of performance, durability, and style. Here’s a detailed review:
**User Experience & Usability:** The sprayer is easy to use and provides a comfortable grip. The trigger is responsive and the spray patterns are easily adjustable. In our experience, the sprayer is intuitive to use, even for first-time users.
**Performance & Effectiveness:** The sprayer delivers a strong and consistent water flow, making it effective for cleaning dishes and sinks. It effectively removes food particles and grime from surfaces. Based on expert consensus, the Delta sprayer consistently outperforms cheaper alternatives.
**Pros:**
1. **Versatile Spray Patterns:** The dual spray functionality provides flexibility for various cleaning tasks.
2. **Durable Construction:** The high-quality materials ensure long-lasting performance.
3. **Ergonomic Design:** The comfortable grip and easy-to-use trigger reduce hand fatigue.
4. **Easy Installation:** The straightforward installation process makes it easy for homeowners to install the sprayer themselves.
5. **Stylish Appearance:** The color-matched finish and sleek design enhance the look of your kitchen.
**Cons/Limitations:**
1. **Price:** The Delta Faucet side sprayer is generally more expensive than other brands.
2. **Hose Material:** While durable, the hose material can be somewhat stiff, which may limit flexibility in some situations.
3. **Potential for Mineral Buildup:** Although it features anti-clog technology, mineral buildup can still occur over time, especially in areas with hard water.
**Ideal User Profile:** The Delta Faucet side sprayer is best suited for homeowners who are looking for a durable, reliable, and stylish sprayer that provides excellent performance. It’s a great choice for those who value quality and are willing to pay a premium for a product that will last.
**Key Alternatives:** Two main alternatives are Moen side sprayers and Kohler side sprayers. Moen offers similar durability and features, while Kohler is known for its innovative designs and technology. However, Delta often strikes a better balance between price and performance.
**Expert Overall Verdict & Recommendation:** The Delta Faucet side sprayer is an excellent choice for homeowners who want a high-quality, reliable, and stylish sprayer. While it may be more expensive than other options, its durability and performance make it a worthwhile investment. We highly recommend the Delta Faucet side sprayer for its superior quality and long-lasting performance.
Insightful Q&A Section
**Q1: Why is my sink sprayer leaking even when the faucet is turned off?**
A: This usually indicates a problem with the diverter valve. The valve isn’t fully sealing, allowing residual water pressure to force water through the sprayer. Replacing the diverter valve is often the solution.
**Q2: How can I tell if the leak is coming from the sprayer head or the hose?**
A: Dry both the sprayer head and hose. Then, activate the sprayer briefly. Observe where the water first appears. If it’s at the sprayer head connections, it’s likely the head or its O-rings. If it’s along the hose, the hose is damaged.
**Q3: Can high water pressure cause my sink sprayer to leak?**
A: Yes, excessive water pressure can stress the sprayer components, particularly the seals and hose, leading to premature wear and leaks. Consider installing a pressure regulator.
**Q4: What’s the best way to clean mineral deposits from my sink sprayer?**
A: Soak the sprayer head and any detachable parts in white vinegar for several hours or overnight. For stubborn deposits, use a descaling solution specifically designed for plumbing fixtures.
**Q5: How often should I replace my sink sprayer hose?**
A: The lifespan of a sprayer hose depends on usage and water quality. However, as a general guideline, consider replacing it every 3-5 years, or sooner if you notice any signs of cracking or damage.
**Q6: Are all sink sprayer hoses the same size?**
A: No, sink sprayer hoses can vary in size and connection type. It’s important to purchase a replacement hose that is compatible with your faucet and sprayer head. Check the manufacturer’s specifications or bring the old hose with you when shopping for a replacement.
**Q7: What type of sealant should I use on the threads of the sprayer hose connections?**
A: Plumber’s tape (PTFE tape) is the recommended sealant for threaded connections. Wrap the tape around the threads in a clockwise direction before tightening the connection.
**Q8: Is it possible to repair a cracked sprayer hose, or do I need to replace it?**
A: It’s generally not recommended to attempt to repair a cracked sprayer hose. The repair is unlikely to be reliable, and the hose could burst under pressure. It’s best to replace the hose with a new one.
**Q9: My sink sprayer is leaking at the quick connect fitting. What should I do?**
A: First, ensure that the quick connect fitting is properly seated and locked in place. If it’s still leaking, the O-ring inside the fitting may be damaged. You can try replacing the O-ring or replacing the entire quick connect fitting.
**Q10: Can I upgrade my existing sink sprayer to a different style or finish?**
A: Yes, you can upgrade your sink sprayer to a different style or finish as long as the new sprayer is compatible with your faucet. Ensure that the hose connection and diverter valve are compatible before making the upgrade.
Conclusion
A leaky sink sprayer can be a frustrating problem, but with a little knowledge and the right tools, you can often diagnose and fix the issue yourself. By understanding the common causes of leaks, following our step-by-step repair guide, and implementing preventative maintenance measures, you can keep your sink sprayer in good working order and avoid costly plumbing repairs. Remember to prioritize safety by turning off the water supply before starting any repairs. We’ve found that regular inspection and prompt attention to minor issues can prevent major problems down the road. As we move into 2025, advancements in sprayer technology are focusing on even greater durability and water efficiency. Share your experiences with sink sprayer repairs in the comments below, or contact our experts for a consultation on more complex plumbing issues.
**Call to Action:** Explore our advanced guide to faucet repair for more in-depth information and troubleshooting tips.
