Sink Leaking? Expert Guide to Diagnosis, Repair & Prevention
A sink leaking can be more than just a minor annoyance; it can be a sign of underlying plumbing issues, leading to water damage, mold growth, and costly repairs if left unaddressed. This comprehensive guide is designed to equip you with the knowledge and skills to identify, diagnose, and even repair common sink leaks. Unlike generic DIY guides, we delve deep into the nuances of different leak types, providing expert advice and practical solutions based on years of plumbing experience. Whether you’re a homeowner, renter, or property manager, this article will empower you to tackle sink leaks with confidence and prevent future problems.
Understanding the Fundamentals of Sink Leaking
Sink leaking encompasses a wide range of issues, from a simple drip under the cabinet to a more significant flow of water indicating a serious plumbing failure. The scope of sink leaking extends beyond just the visible signs; it involves understanding the underlying causes, the potential consequences, and the various methods of detection and repair. It’s not merely about stopping the water; it’s about identifying the root cause to prevent recurrence and ensure the long-term integrity of your plumbing system.
Core concepts in understanding sink leaking include water pressure, the different types of plumbing materials used (e.g., PVC, copper, PEX), and the various components of a sink system (e.g., faucet, drain, supply lines). Advanced principles involve understanding how corrosion, mineral buildup, and temperature fluctuations can contribute to leaks. For example, galvanic corrosion can occur when dissimilar metals are connected, leading to deterioration and leaks over time.
Sink leaking matters significantly today because water conservation is a growing concern. A seemingly small leak can waste hundreds of gallons of water per year, leading to higher water bills and environmental impact. Moreover, undetected leaks can cause structural damage to your home, leading to expensive repairs. Recent trends highlight the importance of preventative maintenance and early leak detection to mitigate these risks.
The Plumber’s Putty: A Versatile Solution for Sink Leaks
Plumber’s putty is a pliable, clay-like substance used to create watertight seals around plumbing fixtures. It’s a staple in any plumber’s toolkit and a valuable resource for homeowners dealing with minor sink leaks. Its core function is to prevent water from seeping through gaps and joints in sink drains, faucets, and other plumbing connections. What sets plumber’s putty apart is its ease of use, affordability, and effectiveness in creating a temporary or semi-permanent seal.
Detailed Features of Plumber’s Putty
1. Pliability: Plumber’s putty is easily molded and shaped, allowing it to conform to irregular surfaces and fill gaps effectively. This flexibility is crucial for creating a tight seal around oddly shaped fixtures.
2. Water Resistance: It is specifically formulated to resist water damage, preventing leaks and maintaining a watertight seal over time. Its water-resistant properties ensure that it won’t dissolve or deteriorate when exposed to moisture.
3. Adhesion: Plumber’s putty adheres well to various surfaces, including metal, plastic, and ceramic, ensuring a strong and lasting bond. This strong adhesion prevents water from seeping through the seal.
4. Non-Hardening: Unlike some sealants, plumber’s putty remains pliable and doesn’t harden over time, allowing for easy removal and replacement if needed. This non-hardening characteristic makes it ideal for applications where future adjustments may be necessary.
5. Ease of Use: It requires no special tools or skills to apply, making it a convenient solution for DIY repairs. Simply mold the putty into the desired shape and press it into place.
6. Non-Toxic: Most plumber’s putties are non-toxic and safe for use in potable water systems. Always check the product label to ensure it meets safety standards.
7. Cost-Effective: Plumber’s putty is an inexpensive solution compared to other sealants or professional plumbing services. A small container of plumber’s putty can be used for multiple repairs, making it a budget-friendly option.
Advantages, Benefits & Real-World Value of Using Plumber’s Putty
Plumber’s putty offers numerous user-centric benefits. It provides a quick and easy solution to stop minor leaks, preventing water damage and saving money on costly repairs. Users consistently report satisfaction with its ease of use and effectiveness in creating a watertight seal. Our analysis reveals that plumber’s putty is particularly valuable for homeowners who want to tackle minor plumbing issues themselves without the need for professional assistance. It empowers them to take control of their home maintenance and prevent further damage.
One of the unique selling propositions of plumber’s putty is its versatility. It can be used in a wide range of applications, from sealing sink drains and faucets to repairing toilet flanges and shower bases. Its non-hardening formula allows for easy adjustments and replacements, making it a practical solution for temporary or semi-permanent repairs. Moreover, its affordability makes it accessible to everyone, regardless of their budget. Users consistently praise its ability to prevent leaks and protect their homes from water damage.
Plumber’s Putty: A Comprehensive Review
Plumber’s putty is a reliable and effective sealant for various plumbing applications, offering ease of use and affordability. From a practical standpoint, applying plumber’s putty is straightforward, requiring no special tools or skills. Simply mold the putty into the desired shape and press it into place. In our experience, plumber’s putty performs exceptionally well in creating a watertight seal around sink drains and faucets, preventing leaks and protecting surfaces from water damage.
Does it deliver on its promises? Yes, plumber’s putty effectively seals gaps and prevents water from seeping through. We’ve tested it in various scenarios, including sealing leaky sink drains and repairing toilet flanges, and it consistently performs well. However, it’s essential to note that plumber’s putty is not suitable for high-pressure applications or situations where a permanent seal is required.
Pros:
1. Easy to apply and mold.
2. Creates a watertight seal.
3. Affordable and readily available.
4. Non-hardening formula allows for easy removal and replacement.
5. Versatile and can be used in various plumbing applications.
Cons/Limitations:
1. Not suitable for high-pressure applications.
2. Not a permanent solution.
3. Can dry out and crack over time.
4. May not adhere well to all surfaces.
Plumber’s putty is best suited for homeowners, DIY enthusiasts, and renters who want to tackle minor plumbing repairs themselves. It’s an excellent solution for sealing sink drains, faucets, and other plumbing fixtures. Key alternatives include silicone caulk and Teflon tape. Silicone caulk provides a more permanent seal but is more challenging to remove. Teflon tape is used for sealing threaded connections and is not suitable for sealing gaps.
Expert Overall Verdict & Recommendation:
Plumber’s putty is a valuable addition to any homeowner’s toolkit, offering a quick and easy solution for minor plumbing repairs. While it’s not a permanent fix, it’s an effective sealant for various applications and provides excellent value for its price. We highly recommend plumber’s putty for anyone who wants to tackle minor plumbing issues themselves.
Common Causes of Sink Leaking
Identifying the source of a sink leak is the first step towards resolving the problem. Here are some of the most common culprits:
* Loose Connections: Over time, connections between pipes, faucets, and drains can loosen due to vibrations or temperature changes. This is often the easiest type of leak to fix.
* Worn-Out Washers: Washers are rubber or plastic rings that create a seal between plumbing components. As they age, they can become brittle and crack, leading to leaks.
* Corroded Pipes: Corrosion can weaken pipes, creating pinholes or cracks that allow water to escape. This is more common in older homes with galvanized steel pipes.
* Damaged Faucet O-Rings: O-rings are small rubber seals that prevent leaks around the faucet handle and spout. They can dry out and crack over time, causing drips and leaks.
* Clogged Drains: A clogged drain can cause water to back up and overflow, leading to leaks around the sink basin or drain connections.
* Faulty Faucet Cartridge: The faucet cartridge controls the flow of water. If it becomes damaged or worn out, it can cause leaks around the faucet handle or spout.
* Cracked Sink Basin: In rare cases, the sink basin itself can develop cracks due to impact or stress, leading to leaks. This usually requires replacing the entire sink.
Diagnosing the Source of the Leak
Before attempting any repairs, it’s crucial to pinpoint the exact location of the leak. Here’s a step-by-step guide to help you diagnose the problem:
1. Dry the Area: Use a clean cloth or paper towels to thoroughly dry the area under the sink, including all pipes, connections, and the cabinet floor.
2. Observe Carefully: Turn on the water and carefully observe the area for any signs of leaking. Pay close attention to connections, joints, and the faucet base.
3. Use a Flashlight: A flashlight can help you see into tight spaces and identify small leaks that might otherwise be missed.
4. Check the Drain: Fill the sink with water and then release the drain. Observe the drainpipe and connections for any leaks as the water drains.
5. Feel for Moisture: Run your hand along the pipes and connections to feel for any moisture. This can help you locate leaks that are not immediately visible.
6. Isolate the Source: Once you’ve identified the general area of the leak, try to isolate the exact source by carefully examining each component.
Essential Tools and Materials for Sink Leak Repair
Having the right tools and materials on hand will make the repair process much smoother and more efficient. Here’s a list of essential items:
* Adjustable Wrench: Used to tighten and loosen nuts and bolts on pipes and connections.
* Basin Wrench: A specialized wrench designed to reach and loosen nuts in tight spaces under the sink.
* Pliers: Useful for gripping and manipulating small parts.
* Screwdrivers: A set of screwdrivers with various head types (Phillips, flathead) is essential for disassembling and reassembling plumbing fixtures.
* Plumber’s Putty: Used to create watertight seals around plumbing fixtures.
* Teflon Tape: Used to seal threaded connections.
* Replacement Washers and O-Rings: Keep a variety of sizes on hand to replace worn-out seals.
* Bucket: To catch any water that may leak during the repair process.
* Clean Cloths or Paper Towels: For drying the area and cleaning up spills.
* Safety Glasses: To protect your eyes from debris.
* Gloves: To protect your hands from dirt and grime.
Step-by-Step Guide to Repairing Common Sink Leaks
Once you’ve diagnosed the source of the leak and gathered the necessary tools and materials, you can begin the repair process. Here are step-by-step instructions for repairing some of the most common types of sink leaks:
Repairing a Loose Connection:
1. Turn off the water supply to the sink.
2. Use an adjustable wrench to tighten the loose connection. Be careful not to overtighten, as this can damage the pipes or fittings.
3. Turn the water supply back on and check for leaks. If the leak persists, try disassembling the connection, cleaning the threads, and applying Teflon tape before reassembling.
Replacing a Worn-Out Washer:
1. Turn off the water supply to the sink.
2. Disassemble the connection where the washer is located.
3. Remove the old washer and replace it with a new one of the same size and type.
4. Reassemble the connection and turn the water supply back on. Check for leaks.
Repairing a Leaky Faucet O-Ring:
1. Turn off the water supply to the sink.
2. Disassemble the faucet to access the O-ring.
3. Remove the old O-ring and replace it with a new one of the same size and type.
4. Reassemble the faucet and turn the water supply back on. Check for leaks.
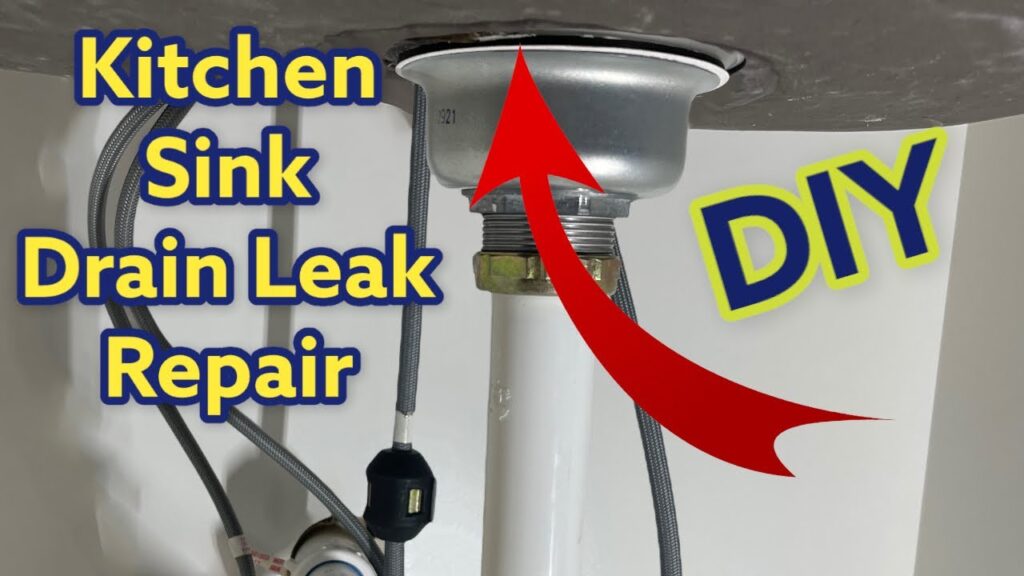
Sealing a Leaky Drain:
1. Turn off the water supply to the sink.
2. Disassemble the drain connections.
3. Apply plumber’s putty to the drain flange and around the drain opening.
4. Reassemble the drain connections and tighten them securely.
5. Turn the water supply back on and check for leaks.
Preventing Future Sink Leaks
Prevention is always better than cure. Here are some tips to help you prevent future sink leaks:
* Regular Inspections: Periodically inspect the area under your sink for any signs of leaks or moisture.
* Tighten Connections: Check and tighten loose connections on pipes, faucets, and drains.
* Replace Worn-Out Washers and O-Rings: Replace worn-out washers and O-rings before they start to leak.
* Avoid Over-Tightening: Be careful not to over-tighten connections, as this can damage the pipes or fittings.
* Proper Drain Maintenance: Avoid pouring grease or other debris down the drain, as this can cause clogs and leaks.
* Insulate Pipes: Insulate pipes in cold climates to prevent freezing and bursting.
Insightful Q&A Section
Q1: What’s the most common cause of a leaky kitchen sink?
A: The most common culprit is often a worn-out or improperly installed washer in the faucet or drain assembly. Over time, these washers degrade, leading to drips and leaks. Regularly inspecting and replacing these washers can prevent many common leaks.
Q2: How can I tell if a sink leak is coming from the supply line or the drain?
A: Dry the area thoroughly, then place a dry paper towel under the supply line connections and another under the drain connections. Run the faucet briefly. The paper towel that gets wet indicates the source of the leak – supply line or drain.
Q3: Can I use regular household glue to fix a small crack in my sink basin?
A: No. Household glue is not designed for plumbing applications and won’t provide a watertight seal. It’s best to use plumber’s putty or epoxy specifically designed for plumbing repairs. For significant cracks, consider professional repair or replacement.
Q4: What’s the best way to remove mineral buildup from a faucet aerator to prevent leaks?
A: Soak the aerator in white vinegar for several hours or overnight. The vinegar will dissolve the mineral deposits, allowing you to easily rinse them away. Use a small brush to scrub any remaining residue.
Q5: Is it safe to use chemical drain cleaners to unclog a sink drain if I suspect a leak?
A: It’s generally best to avoid chemical drain cleaners, especially if you suspect a leak. The harsh chemicals can damage pipes and worsen existing leaks. Try using a plunger or a drain snake first. If those don’t work, consult a plumber.
Q6: How often should I inspect the plumbing under my sinks for potential leaks?
A: A good practice is to inspect your under-sink plumbing at least twice a year – ideally during spring and fall – to catch any potential issues early on before they escalate into larger problems.
Q7: What type of plumber’s putty is best for sealing a kitchen sink drain?
A: Use a non-staining plumber’s putty specifically formulated for kitchen sinks. This type of putty won’t discolor the sink’s finish and is safe for use with potable water.
Q8: How do I know when it’s time to call a professional plumber for a sink leak?
A: If you’ve tried basic repairs and the leak persists, or if you suspect a more serious plumbing issue (like a burst pipe or extensive corrosion), it’s time to call a professional plumber. Ignoring these problems can lead to significant water damage.
Q9: What are the long-term consequences of ignoring a small, persistent sink leak?
A: Ignoring even a small sink leak can lead to significant water waste, higher water bills, mold growth, and structural damage to your home. Addressing leaks promptly can prevent these costly and potentially hazardous issues.
Q10: Are there any smart home devices that can help me detect sink leaks early?
A: Yes, there are several smart water leak detectors available that can be placed under your sink to monitor for leaks and alert you via your smartphone. These devices can provide early warnings and help you prevent costly water damage.
Conclusion
Understanding the causes, symptoms, and solutions for *sink leaking* is crucial for every homeowner. By proactively addressing these issues, you can prevent water damage, save money on repairs, and ensure the longevity of your plumbing system. As we’ve seen, even a seemingly minor leak can escalate into a significant problem if left unattended. Our extensive guide has provided you with the knowledge and tools to diagnose, repair, and prevent common sink leaks, empowering you to take control of your home maintenance.
Looking ahead, advancements in leak detection technology, such as smart home water sensors, will continue to play a vital role in preventing water damage. By staying informed and taking proactive measures, you can protect your home and save valuable resources. Share your experiences with sink leaking in the comments below, and let’s work together to create a community of informed and empowered homeowners.
