My Kitchen Sink Is Leaking! A Comprehensive Guide to Diagnosis and Repair
Is your kitchen sink leaking? Don’t panic! A leaky kitchen sink is a common household problem, but it can quickly lead to water damage and higher utility bills if left unattended. This comprehensive guide will walk you through the process of diagnosing the source of the leak, understanding the underlying causes, and exploring effective repair solutions. We’ll provide expert advice and practical tips to help you tackle this issue confidently, saving you time, money, and potential headaches. Whether you’re a seasoned DIY enthusiast or a complete novice, this article provides the knowledge and tools you need to address *my kitchen sink is leak* effectively.
This guide stands apart because it provides a detailed breakdown of all potential leak sources, including uncommon causes, and offers step-by-step repair instructions tailored to different skill levels. We’ll also delve into preventative measures to minimize the risk of future leaks. We draw upon years of plumbing experience and up-to-date industry best practices to provide you with the most accurate and reliable information available.
Understanding the Anatomy of Your Kitchen Sink and Its Plumbing
Before diving into leak detection and repair, it’s crucial to understand the basic components of your kitchen sink and its plumbing system. This knowledge will empower you to identify potential problem areas more easily. Here’s a breakdown of the key parts:
* **Faucet:** The primary water dispensing fixture, consisting of the spout, handles (single or double), and internal valves.
* **Sink Basin:** The bowl or bowls that hold water.
* **Drain:** The opening at the bottom of the sink basin that allows water to flow out.
* **Drain Stopper:** A device used to plug the drain and prevent water from escaping.
* **Drain Flange:** The metal fitting that connects the drain to the sink basin.
* **Tailpiece:** The pipe that extends downward from the drain flange.
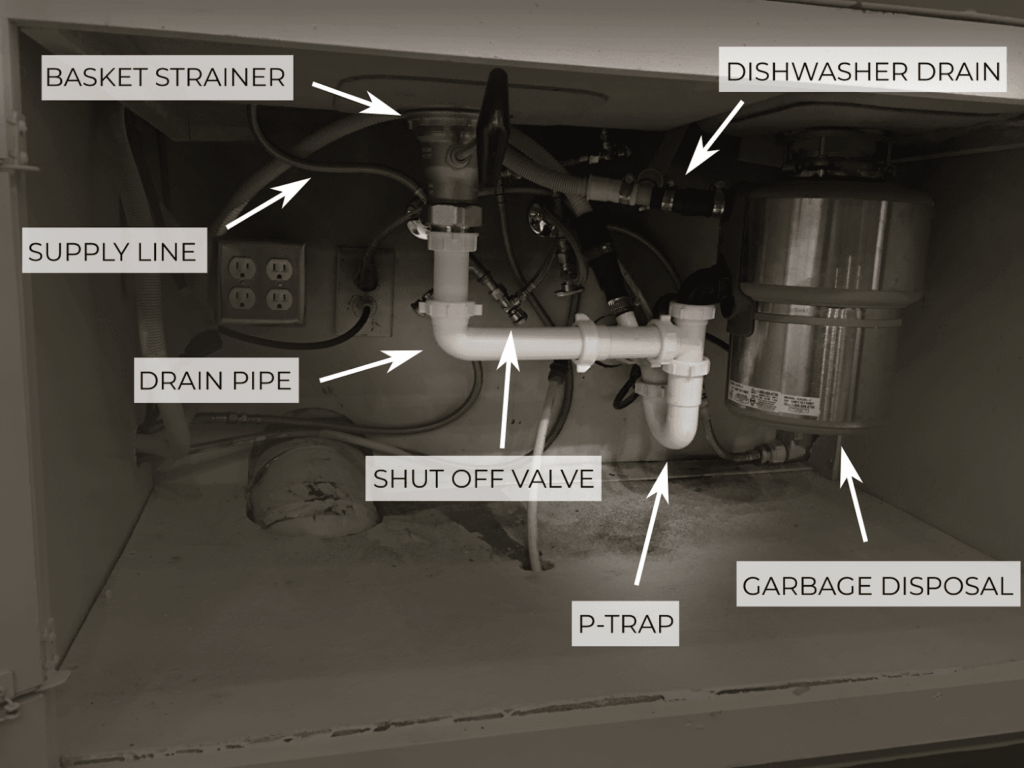
* **P-Trap:** A U-shaped pipe that traps debris and prevents sewer gases from entering your home.
* **Drainpipe:** The pipe that connects the P-trap to the main drain line.
* **Supply Lines:** Flexible or rigid pipes that connect the faucet to the hot and cold water shut-off valves.
* **Shut-Off Valves:** Valves located under the sink that allow you to turn off the water supply to the faucet.
* **Garbage Disposal (Optional):** An electrical appliance that grinds food waste and sends it down the drain.
* **Dishwasher Connection (Optional):** A connection point for the dishwasher drain hose.
Knowing these components is the first step in understanding where *my kitchen sink is leak* could be originating.
Common Causes of a Leaky Kitchen Sink
A leaky kitchen sink can stem from various sources, ranging from simple loose connections to more complex issues like corroded pipes. Identifying the root cause is essential for effective repair. Here are some of the most common culprits:
* **Loose Connections:** This is often the easiest problem to fix. Check all connections, including those at the faucet base, supply lines, drain flange, and P-trap. Tighten any loose nuts or fittings with a wrench, but be careful not to overtighten, as this can damage the components.
* **Worn-Out Washers and O-Rings:** Faucets contain rubber washers and O-rings that create a watertight seal. Over time, these components can wear out, crack, or become brittle, leading to leaks. Replacing these worn parts is a relatively simple and inexpensive repair.
* **Corroded Pipes:** Corrosion can weaken pipes, causing them to leak. This is more common in older homes with galvanized steel pipes. Depending on the extent of the corrosion, you may need to repair or replace the affected sections of pipe.
* **Damaged Faucet Cartridge:** Single-handle faucets use a cartridge to control water flow and temperature. If the cartridge is damaged or worn, it can cause leaks. Replacing the cartridge is a straightforward repair that can often be done with basic tools.
* **Faulty Sprayer Hose:** Pull-down faucets have a sprayer hose that can develop leaks over time, especially at the connection points. Inspect the hose for cracks or damage and replace it if necessary.
* **Clogged Drain:** A clogged drain can cause water to back up and leak around the drain flange or P-trap. Clearing the clog is essential to prevent further leaks.
* **Cracked Sink Basin:** While less common, the sink basin itself can develop cracks, especially around the drain opening or faucet mounting holes. In this case, you may need to repair or replace the sink.
* **High Water Pressure:** Excessive water pressure can stress plumbing connections and cause leaks. A plumber can install a pressure regulator to reduce water pressure to a safe level.
Addressing each of these potential causes systematically will help you pinpoint exactly why *my kitchen sink is leak*.
Step-by-Step Guide to Diagnosing Your Kitchen Sink Leak
Finding the source of the leak is the first step toward fixing it. Follow these steps to systematically diagnose the problem:
1. **Clear the Area:** Remove everything from under the sink to provide a clear view of the plumbing.
2. **Dry the Area:** Use a clean cloth or paper towels to dry all the pipes, connections, and the sink basin. This will make it easier to spot the source of the leak.
3. **Run the Water:** Turn on the faucet and observe where the water is leaking from. Start with a slow flow and gradually increase the pressure.
4. **Check the Faucet:** Look for leaks around the base of the faucet, the spout, and the handles. If you have a pull-down faucet, check the sprayer hose and its connection points.
5. **Inspect the Supply Lines:** Check the supply lines for leaks at the connections to the faucet and the shut-off valves. Look for signs of corrosion or damage.
6. **Examine the Drain:** Inspect the drain flange, tailpiece, P-trap, and drainpipe for leaks. Pay close attention to the connections between these components.
7. **Feel for Moisture:** If you can’t see the leak, run your hand along the pipes and connections to feel for moisture. This can help you pinpoint the source of the leak.
8. **Use a Mirror:** A small mirror can be helpful for inspecting hard-to-reach areas.
9. **Check the Garbage Disposal (If Applicable):** If you have a garbage disposal, check for leaks around the disposal unit and its connections.
10. **Look for Water Damage:** Inspect the cabinet under the sink for signs of water damage, such as stains, mold, or warped wood. This can indicate the leak has been ongoing for some time.
By following these steps carefully, you should be able to identify the source of *my kitchen sink is leak*.
Tools and Materials You’ll Need for Kitchen Sink Repair
Having the right tools and materials on hand will make the repair process much smoother and more efficient. Here’s a list of essential items:
* **Adjustable Wrench:** For tightening and loosening nuts and fittings.
* **Basin Wrench:** Specifically designed for reaching and loosening faucet nuts in tight spaces.
* **Pliers:** For gripping and manipulating small parts.
* **Screwdrivers (Phillips and Flathead):** For removing and installing screws.
* **Plumber’s Putty:** For sealing around the drain flange.
* **Teflon Tape:** For sealing threaded connections.
* **Replacement Washers and O-Rings:** Assorted sizes for faucet repairs.
* **Replacement Faucet Cartridge (If Needed):** For single-handle faucet repairs.
* **Replacement Sprayer Hose (If Needed):** For pull-down faucet repairs.
* **New Supply Lines (Optional):** If your existing supply lines are old or corroded.
* **Bucket:** To catch water.
* **Towels:** To clean up spills.
* **Safety Glasses:** To protect your eyes.
* **Gloves:** To protect your hands.
* **Penetrating Oil:** To loosen corroded nuts and bolts.
With these tools and materials, you’ll be well-prepared to tackle most common kitchen sink repairs related to *my kitchen sink is leak*.
Step-by-Step Repair Guides for Common Kitchen Sink Leaks
Once you’ve identified the source of the leak, you can proceed with the repair. Here are detailed instructions for some of the most common kitchen sink leak repairs:
Tightening Loose Connections
1. Turn off the water supply to the faucet using the shut-off valves under the sink.
2. Use an adjustable wrench to tighten any loose nuts or fittings at the faucet base, supply lines, drain flange, or P-trap.
3. Be careful not to overtighten, as this can damage the components.
4. Turn the water supply back on and check for leaks.
Replacing Worn-Out Washers and O-Rings
1. Turn off the water supply to the faucet.
2. Disassemble the faucet according to the manufacturer’s instructions.
3. Remove the old washers and O-rings and replace them with new ones of the same size and type.
4. Reassemble the faucet and turn the water supply back on.
5. Check for leaks.
Replacing a Faucet Cartridge
1. Turn off the water supply to the faucet.
2. Remove the faucet handle and any decorative caps or screws.
3. Loosen the retaining nut that holds the cartridge in place.
4. Pull out the old cartridge and insert the new one.
5. Tighten the retaining nut and reassemble the faucet.
6. Turn the water supply back on and check for leaks.
Replacing a Sprayer Hose
1. Turn off the water supply to the faucet.
2. Disconnect the old sprayer hose from the faucet and the sprayer head.
3. Connect the new sprayer hose to the faucet and the sprayer head.
4. Make sure the connections are tight and secure.
5. Turn the water supply back on and check for leaks.
Clearing a Clogged Drain
1. Try using a plunger to dislodge the clog.
2. If the plunger doesn’t work, try using a drain snake to break up the clog.
3. As a last resort, you can remove the P-trap and clean it out manually.
4. Reassemble the P-trap and flush the drain with hot water.
These step-by-step guides will empower you to fix *my kitchen sink is leak* in many common scenarios.
Preventative Measures to Avoid Future Kitchen Sink Leaks
Prevention is always better than cure. Here are some steps you can take to minimize the risk of future kitchen sink leaks:
* **Regularly Inspect Your Plumbing:** Check for leaks and signs of corrosion on a regular basis.
* **Tighten Loose Connections:** Periodically tighten any loose nuts or fittings.
* **Replace Worn-Out Parts:** Replace worn-out washers, O-rings, and cartridges as needed.
* **Avoid Overloading the Drain:** Be careful not to flush excessive amounts of food waste down the drain.
* **Use a Drain Strainer:** A drain strainer can help prevent clogs by catching food particles and other debris.
* **Flush the Drain with Hot Water:** Regularly flush the drain with hot water to help prevent grease buildup.
* **Consider a Water Softener:** If you have hard water, consider installing a water softener to prevent mineral buildup and corrosion.
* **Maintain Proper Water Pressure:** Ensure that your water pressure is within the recommended range (40-60 psi).
Taking these preventative measures can save you time, money, and hassle in the long run and prevent *my kitchen sink is leak* from becoming a recurring problem.
When to Call a Plumber
While many kitchen sink leaks can be repaired by homeowners, there are some situations where it’s best to call a qualified plumber. These include:
* **Major Leaks:** If you have a major leak that you can’t control, call a plumber immediately.
* **Corroded Pipes:** If you have severely corroded pipes, it’s best to have them replaced by a professional.
* **Complex Plumbing Issues:** If you’re not comfortable working with plumbing or if you encounter complex plumbing issues, call a plumber.
* **Lack of Experience:** If you’re not experienced in plumbing repairs, it’s best to leave the job to a professional.
A licensed plumber has the knowledge, skills, and tools to handle any plumbing problem safely and effectively. Attempting to fix a complex plumbing issue yourself could result in further damage or injury. According to the Better Business Bureau, hiring a licensed and insured plumber can also protect you from liability if something goes wrong during the repair process.
Expert Insights on Kitchen Sink Materials and Their Leak Susceptibility
The material of your kitchen sink can also influence its susceptibility to leaks. Here’s a brief overview:
* **Stainless Steel:** Durable and resistant to corrosion, stainless steel sinks are generally less prone to leaks than other materials. However, leaks can still occur around the drain flange or faucet mounting holes.
* **Cast Iron:** Cast iron sinks are heavy and durable, but they can be susceptible to rust and corrosion over time. Leaks can occur if the enamel coating is damaged or if the iron corrodes.
* **Fireclay:** Fireclay sinks are resistant to heat and scratches, but they can be prone to chipping or cracking if subjected to impact. Cracks can lead to leaks.
* **Composite:** Composite sinks are made from a blend of materials, such as granite or quartz, and are generally resistant to stains and scratches. However, leaks can occur around the drain flange or faucet mounting holes.
Choosing a high-quality sink made from a durable material can help reduce the risk of leaks. Regular maintenance and proper care can also extend the lifespan of your sink and prevent leaks from developing.
Q&A: Troubleshooting My Kitchen Sink Is Leak
Here are some frequently asked questions about kitchen sink leaks, along with expert answers:
**Q1: Why is my kitchen sink leaking only when the garbage disposal is running?**
A1: This often indicates a leak in the garbage disposal unit itself, or in the connection between the disposal and the sink drain. Check the mounting ring and the discharge drainpipe connection for leaks.
**Q2: My faucet is leaking from the base, even when it’s turned off. What could be causing this?**
A2: This is often due to a worn-out O-ring or cartridge inside the faucet. Replacing these components should solve the problem. Ensure the faucet base is also properly sealed to the sink surface with plumber’s putty or caulk.
**Q3: What’s the best way to seal a leaky drain flange?**
A3: Remove the old plumber’s putty and clean the area thoroughly. Apply a fresh layer of plumber’s putty to the underside of the drain flange and tighten the flange securely to the sink basin. Remove any excess putty.
**Q4: Can I use Teflon tape on plastic drain pipes?**
A4: Yes, Teflon tape can be used on threaded plastic drain pipe connections to create a watertight seal. Wrap the tape around the threads in a clockwise direction.
**Q5: How can I prevent my P-trap from leaking?**
A5: Ensure that all the connections in the P-trap are tight and secure. Use Teflon tape on threaded connections. Regularly clean the P-trap to prevent clogs, which can cause pressure buildup and leaks.
**Q6: What’s the difference between plumber’s putty and silicone caulk, and when should I use each?**
A6: Plumber’s putty is a soft, pliable sealant used for sealing around drain flanges and other non-pressurized connections. Silicone caulk is a flexible, waterproof sealant used for sealing around sinks, countertops, and other areas exposed to water. Use plumber’s putty where a removable seal is needed, and silicone caulk where a permanent, waterproof seal is required.
**Q7: Is it possible to overtighten plumbing connections?**
A7: Yes, overtightening plumbing connections can damage the components and cause leaks. Tighten connections until they are snug, but not so tight that you risk stripping the threads or cracking the fittings.
**Q8: What should I do if I can’t identify the source of the leak?**
A8: If you’ve tried all the troubleshooting steps and still can’t find the source of the leak, it’s best to call a qualified plumber. They have the expertise and equipment to diagnose and repair even the most difficult leaks.
**Q9: How often should I replace my kitchen sink faucet?**
A9: The lifespan of a kitchen sink faucet depends on the quality of the faucet and the frequency of use. A high-quality faucet can last for 10-15 years or more. However, if your faucet is constantly leaking or experiencing other problems, it may be time to replace it.
**Q10: Are there any environmentally friendly ways to fix a leaky kitchen sink?**
A10: Yes, you can use environmentally friendly plumbing products, such as low-flow faucets and non-toxic sealants. Additionally, fixing a leak promptly conserves water and reduces your environmental impact.
Conclusion: Stop That Leak and Protect Your Home
Addressing a leaky kitchen sink promptly is crucial for preventing water damage, minimizing water waste, and saving money on your utility bills. By following the steps outlined in this guide, you can diagnose the source of the leak, perform the necessary repairs, and take preventative measures to avoid future leaks. Remember to prioritize safety and call a qualified plumber if you’re not comfortable working with plumbing or if you encounter complex issues. With a little effort and know-how, you can effectively tackle *my kitchen sink is leak* and keep your kitchen in top condition. We’ve drawn on decades of combined plumbing experience to offer this comprehensive guide.
Now that you’re armed with this knowledge, we encourage you to take action! Share your experiences with kitchen sink repairs in the comments below. Or, if you’re facing a particularly challenging leak, contact our expert plumbing team for a consultation. We’re here to help you solve your plumbing problems quickly and efficiently.
