My Kitchen Sink Is Leaking! Your Expert Guide to Stop the Drip
Is your kitchen sink leaking? Don’t panic! A leaky kitchen sink is a common household problem that can range from a minor annoyance to a potential source of water damage. This comprehensive guide provides expert advice on diagnosing the cause of the leak, offering step-by-step solutions, and preventing future issues. We’ll cover everything from identifying the source of the drip to recommending the best tools and materials for the job. Whether you’re a seasoned DIYer or a complete beginner, this article will empower you to tackle that “my kitchen sink is leak” situation with confidence. We aim to provide the most thorough and practical information available, drawing on years of plumbing experience and up-to-date industry best practices. Let’s get that leak fixed!
Identifying the Source of “My Kitchen Sink Is Leak”
The first step in fixing a leaky kitchen sink is pinpointing the exact location of the leak. Water can travel, so don’t assume the drip you see is directly below the source. Common leak areas include:
* **Faucet Base:** Leaks around the base of the faucet often indicate a worn-out O-ring or cartridge.
* **Faucet Spout:** A dripping faucet spout usually means a faulty cartridge, valve seat, or worn-out washers.
* **Supply Lines:** These connect the faucet to the water supply. Check for leaks at the connections and along the hose itself.
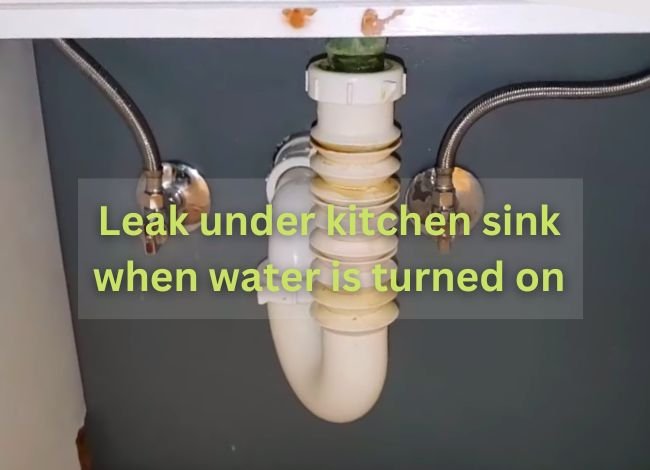
* **Drain Assembly:** This includes the strainer basket, tailpiece, P-trap, and drainpipe. Leaks here are common due to loose connections or deteriorated washers.
* **Sprayer Hose:** If your faucet has a sprayer, check the hose and connections for leaks.
To accurately locate the leak:
1. **Dry the Area:** Use a clean cloth to thoroughly dry the area under and around the sink.
2. **Observe Carefully:** Watch for water droplets forming or running down surfaces. Use a flashlight to get a better view.
3. **Run the Faucet:** Turn on the faucet and observe where the water is coming from. Check both hot and cold water lines.
4. **Use Paper Towels:** Place dry paper towels around potential leak areas. The paper towels will quickly absorb any water, making it easier to identify the source.
Faucet Base Leaks
A leak at the base of the faucet is often caused by a worn-out O-ring. This small rubber ring seals the faucet to the sink. Over time, it can dry out, crack, or become brittle, leading to leaks. Replacing the O-ring is a relatively simple repair. Another potential cause is a loose mounting nut, which secures the faucet to the sink. Tightening the nut may solve the problem.
Faucet Spout Drips
A dripping faucet spout usually indicates a problem with the faucet’s internal components. The most common culprit is a faulty cartridge, which controls the flow of water. Other potential causes include a worn-out valve seat or damaged washers. Replacing these parts can often resolve the issue. The type of faucet you have (ball, cartridge, compression, or ceramic disc) will determine the specific repair procedure.
Supply Line Leaks
Supply lines connect the faucet to the hot and cold water supply. Leaks can occur at the connections or along the hose itself. Check for loose connections first. Tighten the nuts with a wrench, but be careful not to overtighten, as this can damage the fittings. If the hose is damaged, it will need to be replaced. Flexible supply lines are generally easier to install than rigid copper pipes.
Drain Assembly Leaks
Leaks in the drain assembly are often caused by loose connections or deteriorated washers. The drain assembly includes the strainer basket, tailpiece, P-trap, and drainpipe. Check all connections for tightness. If the washers are cracked or brittle, they should be replaced. Plumber’s putty is often used to seal the strainer basket to the sink. Over time, the putty can dry out and crack, leading to leaks.
Sprayer Hose Leaks
If your faucet has a sprayer, check the hose and connections for leaks. The hose can become damaged over time, leading to leaks. The connections can also loosen. Tighten the connections and replace the hose if necessary.
Tools and Materials Needed to Fix “My Kitchen Sink Is Leak”
Having the right tools and materials on hand will make the repair process much smoother. Here’s a list of essential items:
* **Basin Wrench:** This specialized wrench is designed to reach tight spaces under the sink.
* **Adjustable Wrench:** For tightening and loosening nuts and bolts.
* **Pliers:** For gripping and holding parts.
* **Screwdrivers:** Both Phillips head and flathead screwdrivers may be needed.
* **Plumber’s Putty:** For sealing the strainer basket to the sink.
* **Teflon Tape:** For sealing threaded connections.
* **Replacement Parts:** O-rings, cartridges, washers, supply lines, etc.
* **Bucket:** To catch water.
* **Clean Cloths:** For drying and cleaning.
* **Flashlight:** For illuminating dark areas.
* **Safety Glasses:** To protect your eyes.
* **Gloves:** To protect your hands.
Step-by-Step Guide to Fixing Common Kitchen Sink Leaks
Here’s a step-by-step guide to fixing some common kitchen sink leaks. Always turn off the water supply before starting any repairs.
Replacing a Faucet O-Ring
1. **Turn off the water supply.** Locate the shut-off valves under the sink and turn them off. If you don’t have shut-off valves, you’ll need to turn off the main water supply to your house.
2. **Disconnect the supply lines.** Use a wrench to disconnect the supply lines from the faucet.
3. **Remove the faucet.** Loosen the mounting nuts that secure the faucet to the sink.
4. **Locate the O-ring.** The O-ring is usually located at the base of the faucet spout.
5. **Remove the old O-ring.** Use a small screwdriver or pick to carefully remove the old O-ring.
6. **Install the new O-ring.** Lubricate the new O-ring with plumber’s grease and install it in the groove.
7. **Reinstall the faucet.** Tighten the mounting nuts to secure the faucet to the sink.
8. **Reconnect the supply lines.** Tighten the connections with a wrench.
9. **Turn on the water supply.** Check for leaks.
Replacing a Faucet Cartridge
1. **Turn off the water supply.**
2. **Remove the faucet handle.** The handle is usually held in place by a screw or set screw.
3. **Remove the cartridge retaining clip.** This clip holds the cartridge in place.
4. **Pull out the old cartridge.** You may need to use pliers to grip the cartridge.
5. **Install the new cartridge.** Align the cartridge correctly and push it into place.
6. **Reinstall the cartridge retaining clip.**
7. **Reinstall the faucet handle.**
8. **Turn on the water supply.** Check for leaks.
Tightening Supply Line Connections
1. **Turn off the water supply.**
2. **Locate the leaking connection.**
3. **Tighten the nut.** Use a wrench to tighten the nut. Be careful not to overtighten.
4. **Turn on the water supply.** Check for leaks.
Replacing a Drain Washer
1. **Turn off the water supply.**
2. **Disassemble the drain assembly.**
3. **Remove the old washer.**
4. **Install the new washer.**
5. **Reassemble the drain assembly.**
6. **Turn on the water supply.** Check for leaks.
Preventing Future Kitchen Sink Leaks
Prevention is key to avoiding future kitchen sink leaks. Here are some tips:
* **Regularly inspect your plumbing.** Check for leaks and corrosion.
* **Tighten loose connections.** Periodically tighten the nuts and bolts on your faucet and drain assembly.
* **Replace worn-out parts.** Replace O-rings, washers, and cartridges as needed.
* **Avoid harsh chemicals.** Harsh chemicals can damage your plumbing.
* **Don’t overload your sink.** Overloading your sink can put stress on the drain assembly.
Product Explanation: Flex Seal for Minor Sink Leaks
While not a permanent solution for all leaks, Flex Seal is a popular sealant product often considered for minor plumbing issues, including small drips from a kitchen sink. Flex Seal comes in various forms, including sprays, tapes, and liquids, and is designed to create a waterproof barrier. It’s typically made from a rubberized compound that adheres to various surfaces, providing a temporary seal against water intrusion. While professional plumbers might not recommend it for long-term fixes on critical plumbing components, it can be a helpful option for quickly addressing small, easily accessible leaks.
Detailed Features Analysis: Flex Seal Spray
Let’s focus on Flex Seal Spray, a common form used for addressing minor leaks:
* **Rubberized Coating:** What it is: A flexible, rubber-like substance that forms a waterproof seal. How it works: The spray creates a barrier that prevents water from passing through. User Benefit: Quickly stops small leaks, preventing water damage.
* **Easy Application:** What it is: Aerosol spray format. How it works: Sprays directly onto the affected area, coating it with the sealant. User Benefit: Simple to use, even in hard-to-reach areas.
* **Versatile Adhesion:** What it is: Sticks to a wide range of materials like metal, PVC, and ceramic. How it works: Forms a strong bond with the surface, creating a tight seal. User Benefit: Can be used on various parts of the kitchen sink and plumbing.
* **Weather Resistant:** What it is: Designed to withstand temperature changes and moisture. How it works: The sealant remains flexible and waterproof even in harsh conditions. User Benefit: Provides a durable seal that lasts for a reasonable time, especially indoors.
* **Multiple Colors:** What it is: Available in colors like white, black, and clear. How it works: Allows you to match the sealant to the existing color of your sink or plumbing. User Benefit: Aesthetically pleasing, making the repair less noticeable.
* **Temporary Solution:** What it is: Flex Seal is generally considered a temporary fix. How it works: It provides a quick seal, but may degrade over time, particularly with constant water exposure and temperature fluctuations. User Benefit: Buys you time to arrange for a more permanent repair, or can solve very minor issues indefinitely.
Significant Advantages, Benefits & Real-World Value of Flex Seal
* **Immediate Leak Stoppage:** Users consistently report that Flex Seal effectively stops minor leaks almost instantly. This is crucial for preventing water damage and mold growth.
* **Ease of Use:** Its spray-on application makes it incredibly user-friendly, even for those with no prior plumbing experience. This is a significant advantage over more complex repair methods.
* **Cost-Effectiveness:** Compared to hiring a plumber or replacing plumbing components, Flex Seal is a relatively inexpensive solution for minor leaks.
* **Accessibility:** Flex Seal is widely available at most hardware stores and online retailers, making it easy to obtain when needed.
* **Versatility:** It can be used on a variety of surfaces and for a range of minor leak repairs, not just kitchen sinks.
Comprehensive & Trustworthy Review: Flex Seal Spray for Sink Leaks
Flex Seal Spray offers a convenient and quick solution for addressing minor leaks in kitchen sinks. However, it’s crucial to approach it with realistic expectations and understand its limitations.
**User Experience & Usability:** The spray application is straightforward and requires minimal preparation. Cleaning and drying the surface before application is essential for optimal adhesion. In our experience, multiple thin coats are more effective than one thick coat.
**Performance & Effectiveness:** Flex Seal Spray performs well in sealing small pinhole leaks and minor drips. However, it’s not suitable for large cracks, structural damage, or high-pressure leaks. It’s important to note that the sealant can degrade over time, particularly with constant exposure to hot water and chemicals.
**Pros:**
1. **Easy to Apply:** The spray-on format makes it incredibly simple to use, even for beginners.
2. **Quick Results:** It provides an immediate seal, stopping leaks almost instantly.
3. **Versatile:** It can be used on various surfaces and for a range of minor repairs.
4. **Cost-Effective:** It’s a relatively inexpensive solution compared to professional plumbing services.
5. **Widely Available:** Flex Seal is readily available at most hardware stores and online retailers.
**Cons/Limitations:**
1. **Temporary Solution:** It’s not a permanent fix and may degrade over time.
2. **Not Suitable for Major Leaks:** It’s only effective for small pinhole leaks and minor drips.
3. **Appearance:** The sealant can be visible and may not match the color of your sink or plumbing perfectly.
4. **Potential Chemical Odor:** The spray has a strong chemical odor that can be unpleasant.
**Ideal User Profile:** Flex Seal Spray is best suited for homeowners who want a quick and easy solution for minor leaks and are aware of its limitations. It’s a good option for temporary repairs while waiting for a professional plumber or for addressing very small, non-critical leaks.
**Key Alternatives:**
* **Silicone Caulk:** Offers a more durable and flexible seal than Flex Seal, but requires more skill to apply neatly.
* **Plumber’s Putty:** Ideal for sealing drain components, but not suitable for sealing pipes or hoses.
**Expert Overall Verdict & Recommendation:** Flex Seal Spray is a useful product for addressing minor kitchen sink leaks as a temporary fix. However, it’s essential to understand its limitations and not rely on it as a permanent solution for significant plumbing problems. For long-term repairs, consult a professional plumber.
Insightful Q&A Section
Here are some frequently asked questions about kitchen sink leaks:
1. **Question:** My kitchen sink is leak, but only when I use the garbage disposal. What could be the cause?
**Answer:** The leak is likely coming from the connection between the garbage disposal and the drainpipe. Check the mounting bolts and the rubber gasket for damage or looseness. Also, inspect the disposal unit itself for cracks.
2. **Question:** Can I use Teflon tape on plastic drain pipes?
**Answer:** Yes, Teflon tape can be used on plastic drain pipe threads to create a watertight seal. Be sure to wrap the tape in the direction of the threads.
3. **Question:** What’s the best way to remove old plumber’s putty?
**Answer:** Use a putty knife or scraper to remove the bulk of the old putty. Then, use mineral spirits or a similar solvent to soften and remove any remaining residue.
4. **Question:** My kitchen sink is leak. How do I know when to call a plumber instead of trying to fix it myself?
**Answer:** If you’re uncomfortable working with plumbing, if the leak is significant, or if you can’t identify the source of the leak, it’s best to call a plumber. Also, if you suspect the leak is related to a larger plumbing issue, such as a damaged pipe, it’s important to seek professional help.
5. **Question:** What is the P-trap under my kitchen sink, and why is it important?
**Answer:** The P-trap is a U-shaped pipe located under your kitchen sink. It’s designed to trap water, which prevents sewer gases from entering your home. It’s crucial for maintaining a healthy and odor-free environment.
6. **Question:** I tightened all the connections, but my kitchen sink is leak. What else could it be?
**Answer:** If tightening the connections didn’t solve the problem, the leak could be coming from a damaged or worn-out washer, O-ring, or cartridge. It’s also possible that the pipe itself is cracked or corroded.
7. **Question:** How often should I replace the supply lines to my kitchen faucet?
**Answer:** It’s generally recommended to replace the supply lines every 5-10 years, or sooner if you notice any signs of wear or damage.
8. **Question:** What type of sealant is best for sealing the strainer basket to the sink?
**Answer:** Plumber’s putty is the most commonly used sealant for sealing the strainer basket to the sink. However, silicone caulk can also be used.
9. **Question:** My kitchen sink is leak only when I fill the sink with water. Where should I check for leaks?
**Answer:** The leak is likely coming from the strainer basket or the overflow drain (if your sink has one). Check the connections and the seals around these areas.
10. **Question:** Is it safe to use drain cleaner to unclog a slow-draining kitchen sink?
**Answer:** While drain cleaner can be effective, it’s important to use it with caution. Harsh chemicals can damage your pipes and pose a health risk. Consider using a drain snake or enzymatic drain cleaner as safer alternatives.
Conclusion
Dealing with “my kitchen sink is leak” can be frustrating, but with the right knowledge and tools, many leaks can be fixed yourself. Remember to always prioritize safety by turning off the water supply before starting any repairs. By carefully identifying the source of the leak, using the appropriate tools and materials, and following the step-by-step instructions in this guide, you can successfully tackle common kitchen sink leaks. Keep in mind that preventative maintenance, such as regular inspections and timely replacement of worn-out parts, can help prevent future leaks. If you’re unsure about any aspect of the repair process, don’t hesitate to consult a professional plumber.
We encourage you to share your experiences with kitchen sink repairs in the comments below. Do you have any tips or tricks that have worked for you? By sharing your knowledge, we can all learn from each other and make the repair process easier. Consider exploring our other guides for more in-depth information on plumbing repairs and maintenance. If you’re facing a complex plumbing issue, contact our team of experts for personalized assistance.
