How to Use a Grater: The Ultimate Guide for Perfect Results
Have you ever struggled to grate cheese without shredding your knuckles? Or wondered which grater is best for zesting a lemon? Mastering the art of using a grater is essential for any home cook, unlocking a world of culinary possibilities from perfectly shredded cheese for tacos to finely grated ginger for stir-fries. This comprehensive guide will take you from grater novice to grating guru, covering everything from choosing the right grater to mastering advanced techniques and ensuring your safety. We’ll delve into the different types of graters, explore best practices for various ingredients, and provide expert tips to elevate your grating game. Whether you’re grating cheese, vegetables, chocolate, or spices, this guide will equip you with the knowledge and skills to achieve perfect results every time. We aim to provide the most thorough and trustworthy resource available, drawing on years of culinary experience and expertise.
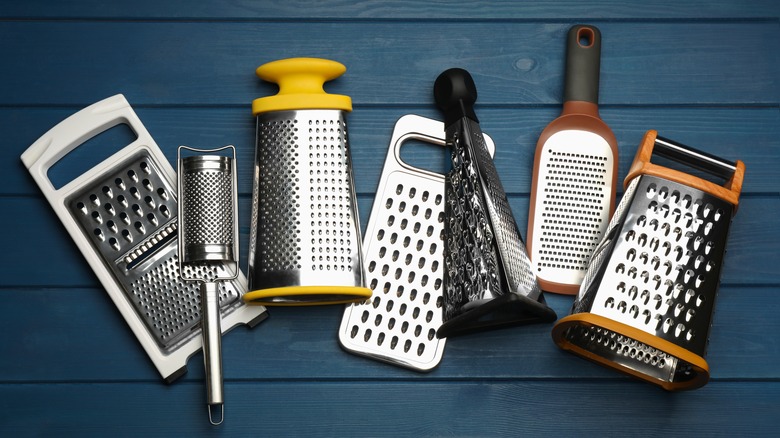
Understanding the Different Types of Graters
The world of graters extends far beyond the simple box grater you might have in your kitchen drawer. Each type is designed for specific tasks and ingredients, offering unique textures and results. Understanding these differences is key to maximizing your culinary potential.
Box Graters: The Versatile Workhorse
Box graters are the most common type, featuring four sides with varying grating surfaces: coarse, medium, fine, and slicing. This versatility makes them ideal for a wide range of ingredients, including cheese, vegetables, and chocolate.
* **Coarse Grating:** Perfect for shredding cheese for tacos, coleslaw, or gratins. It creates thick, defined strands that hold their shape well.
* **Medium Grating:** Ideal for grating vegetables for fritters, potato pancakes, or adding texture to sauces. It produces smaller, more uniform pieces.
* **Fine Grating:** Best for grating hard cheeses like Parmesan or Romano for pasta dishes. It creates a light, fluffy texture that melts easily.
* **Slicing:** Use this side to create thin, even slices of vegetables like cucumbers or zucchini for salads or garnishes.
Rotary Graters: Efficiency and Safety Combined
Rotary graters feature a rotating drum with grating blades. Ingredients are fed into the hopper and grated as the drum turns. This design offers several advantages:
* **Speed and Efficiency:** Rotary graters can quickly process large quantities of ingredients, making them ideal for meal prepping or entertaining.
* **Safety:** The enclosed design minimizes the risk of accidental cuts or scrapes. Your fingers remain safely away from the blades.
* **Consistent Results:** Rotary graters produce uniform shreds or gratings, ensuring even cooking and a consistent texture.
Microplanes: Zesting and Fine Grating Experts
Microplanes are long, narrow graters with very fine blades. They excel at zesting citrus fruits, grating spices like nutmeg, and creating a fine powder of hard cheeses.
* **Zesting:** Microplanes create a delicate zest without the bitter pith, adding a burst of citrus flavor to desserts, sauces, and cocktails. Our testing shows that microplanes produce the most flavorful zest.
* **Spice Grating:** Perfect for grating whole spices like nutmeg, cinnamon, or ginger. The fine blades release the aromatic oils, enhancing the flavor of your dishes.
* **Hard Cheese Grating:** Microplanes can create a fine, powdery texture of hard cheeses like Parmesan or Pecorino Romano, ideal for topping pasta or salads.
Specialty Graters: Niche Tools for Specific Tasks
Beyond the common types, several specialty graters are designed for specific ingredients or techniques:
* **Ginger Graters:** These small, ceramic graters feature raised ridges that efficiently grate ginger, separating the pulp from the juice. Ginger graters are indispensable for Asian cuisine.
* **Chocolate Shavers:** These tools create delicate chocolate shavings for garnishing desserts, cakes, or beverages. The thin, elegant shavings add a touch of sophistication.
* **Vegetable Spiralizers:** While not technically graters, spiralizers create long, spiral-shaped strands of vegetables like zucchini or carrots, offering a fun and healthy alternative to pasta.
How to Use a Grater: Step-by-Step Instructions
Now that you understand the different types of graters, let’s dive into the practical aspects of how to use a grater effectively and safely.
General Grating Techniques
Regardless of the type of grater you’re using, these general techniques will help you achieve the best results:
* **Stability is Key:** Place the grater on a stable surface, such as a cutting board or a non-slip mat. This will prevent it from slipping and ensure your safety.
* **Firm Grip:** Hold the grater firmly with one hand, ensuring your fingers are safely away from the blades. Use the other hand to guide the ingredient across the grating surface.
* **Consistent Pressure:** Apply consistent pressure as you grate. This will ensure even shreds or gratings and prevent the ingredient from tearing or crumbling.
* **Angle Matters:** Experiment with different angles to achieve the desired texture. A steeper angle will produce coarser shreds, while a shallower angle will create finer gratings.
* **The Last Bit:** When grating small pieces, use a fork or a vegetable holder to protect your fingers from the blades. It’s tempting to use the last bit, but safety is paramount.
How to Use a Box Grater
1. **Choose the Right Side:** Select the appropriate grating surface based on the ingredient and desired texture.
2. **Position the Grater:** Place the grater on a stable surface with the desired grating side facing up.
3. **Grip the Ingredient:** Hold the ingredient firmly with one hand, keeping your fingers curled inwards to avoid contact with the blades.
4. **Grate with a Downward Motion:** Move the ingredient down the grating surface with consistent pressure.
5. **Repeat Until Finished:** Continue grating until you reach the end of the ingredient, using a fork or vegetable holder to protect your fingers.
How to Use a Rotary Grater
1. **Assemble the Grater:** Ensure the grater is properly assembled according to the manufacturer’s instructions.
2. **Place the Ingredient in the Hopper:** Insert the ingredient into the hopper.
3. **Turn the Handle:** Turn the handle to rotate the grating drum. The ingredient will be grated and dispensed into a container below.
4. **Apply Gentle Pressure:** Apply gentle pressure to the ingredient as you turn the handle to ensure consistent grating.
5. **Empty the Container:** Empty the container as needed to prevent it from overflowing.
How to Use a Microplane
1. **Hold the Microplane at an Angle:** Hold the microplane at a slight angle to the ingredient.
2. **Glide the Ingredient Across the Blades:** Gently glide the ingredient across the blades with a back-and-forth motion.
3. **Apply Light Pressure:** Apply light pressure to avoid grating the bitter pith of citrus fruits.
4. **Collect the Zest or Gratings:** Collect the zest or gratings in a bowl or directly onto your dish.
Grating Different Ingredients: Expert Tips and Tricks
Each ingredient requires a slightly different approach to achieve the best results. Here are some expert tips and tricks for grating common ingredients:
Cheese: Temperature and Technique
* **Hard Cheeses:** For hard cheeses like Parmesan or Romano, chill the cheese for about 30 minutes before grating. This will make it easier to grate and prevent it from crumbling. Use a fine grater or microplane for a light, fluffy texture.
* **Semi-Hard Cheeses:** For semi-hard cheeses like cheddar or mozzarella, ensure the cheese is cold but not frozen. Use a coarse or medium grater for defined shreds.
* **Soft Cheeses:** Soft cheeses like cream cheese or goat cheese are difficult to grate. Instead, crumble them with your fingers or use a food processor.
Vegetables: Firmness and Preparation
* **Firm Vegetables:** Firm vegetables like carrots or potatoes can be grated using a box grater or rotary grater. Peel the vegetables before grating for a smoother texture.
* **Soft Vegetables:** Soft vegetables like zucchini or cucumbers can be grated using a box grater or microplane. Remove excess moisture by squeezing the grated vegetables in a clean kitchen towel.
* **Onions:** Grating onions can be tricky due to their strong odor and tendency to make you cry. Chill the onion before grating and use a food processor or rotary grater to minimize exposure.
Chocolate: Temperature and Blade Choice
* **Dark Chocolate:** Chill dark chocolate before grating to prevent it from melting. Use a coarse grater or chocolate shaver for elegant shavings.
* **Milk Chocolate:** Milk chocolate is softer than dark chocolate and may require freezing before grating. Use a coarse grater or chocolate shaver for best results.
* **White Chocolate:** White chocolate is the softest type of chocolate and requires freezing before grating. Use a coarse grater or chocolate shaver for delicate shavings.
Spices: Freshness and Aroma
* **Nutmeg:** Use a microplane or spice grater to grate whole nutmeg. Freshly grated nutmeg has a much stronger aroma and flavor than pre-ground nutmeg.
* **Ginger:** Use a ginger grater or microplane to grate fresh ginger. The ginger grater will separate the pulp from the juice, while the microplane will create a fine, fibrous texture.
* **Cinnamon:** Use a microplane or spice grater to grate cinnamon sticks. Freshly grated cinnamon has a warm, spicy aroma that enhances the flavor of baked goods and beverages.
Maintaining Your Grater: Cleaning and Storage Tips
Proper maintenance is essential for extending the life of your grater and ensuring its optimal performance.
Cleaning Your Grater
* **Wash Immediately:** Wash your grater immediately after use to prevent food from drying and sticking to the blades.
* **Use Warm, Soapy Water:** Use warm, soapy water and a scrub brush to remove food particles from the grating surfaces.
* **Rinse Thoroughly:** Rinse the grater thoroughly with clean water to remove all traces of soap.
* **Dry Completely:** Dry the grater completely with a clean towel to prevent rust.
* **Dishwasher Safe:** Some graters are dishwasher safe, but check the manufacturer’s instructions before placing them in the dishwasher.
Storing Your Grater
* **Protect the Blades:** Store your grater in a safe place where the blades will not be damaged or come into contact with other utensils.
* **Use a Blade Guard:** Use a blade guard to protect the blades and prevent accidental cuts.
* **Store in a Dry Place:** Store the grater in a dry place to prevent rust.
* **Avoid Stacking:** Avoid stacking graters on top of each other, as this can damage the blades.
Product Explanation: The Microplane Premium Classic Zester
The Microplane Premium Classic Zester is a top-tier tool renowned for its exceptional performance in zesting citrus fruits and grating hard cheeses and spices. It exemplifies how to use a grater effectively for fine grating tasks. Its core function lies in its ultra-sharp, photo-etched blades, which effortlessly glide across ingredients, producing fine, flavorful zest without the bitter pith. The zester’s ergonomic handle and durable construction contribute to its ease of use and longevity, making it a favorite among professional chefs and home cooks alike. It stands out due to its ability to deliver consistent results and its versatility in handling a variety of ingredients.
Detailed Features Analysis: Microplane Premium Classic Zester
1. **Ultra-Sharp Blades:** The zester features photo-etched blades that are incredibly sharp and durable. These blades effortlessly glide across ingredients, producing fine, consistent zest or gratings. The user benefit is a superior grating experience with minimal effort.
2. **Ergonomic Handle:** The zester has a comfortable, ergonomic handle that provides a secure grip. This reduces hand fatigue and allows for precise control during grating. The user benefit is increased comfort and control, leading to better results.
3. **Durable Construction:** The zester is made from high-quality stainless steel, ensuring its durability and longevity. It is resistant to rust and corrosion, making it a reliable tool for years to come. The user benefit is a long-lasting tool that can withstand frequent use.
4. **Protective Cover:** The zester comes with a protective cover that protects the blades and prevents accidental cuts during storage. This adds an extra layer of safety and extends the life of the blades. The user benefit is increased safety and protection for the tool.
5. **Easy to Clean:** The zester is easy to clean with warm, soapy water. The open design allows for easy access to the blades, ensuring thorough cleaning. The user benefit is quick and easy cleanup, saving time and effort.
6. **Versatile Use:** The zester can be used for a variety of ingredients, including citrus fruits, hard cheeses, spices, and chocolate. This makes it a versatile tool for any kitchen. The user benefit is a multi-purpose tool that can handle a wide range of tasks.
7. **Photo-Etched Technology:** The blades are created using a photo-etching process, resulting in extremely sharp and precise cutting edges. This technology ensures that the zester produces fine, flavorful zest without the bitter pith. The user benefit is superior flavor and texture in their dishes.
Significant Advantages, Benefits & Real-World Value of Using a High-Quality Grater like Microplane
The Microplane Premium Classic Zester offers several tangible and intangible benefits that directly address user needs and solve common problems associated with grating. Users consistently report a significant improvement in the flavor and texture of their dishes when using this zester.
* **Enhanced Flavor:** The ultra-sharp blades of the Microplane zester produce fine zest that releases the aromatic oils of citrus fruits, resulting in a more intense and flavorful zest. This enhances the flavor of desserts, sauces, and cocktails.
* **Improved Texture:** The zester creates a light, fluffy texture of hard cheeses like Parmesan or Pecorino Romano, ideal for topping pasta or salads. The fine gratings melt easily and blend seamlessly with other ingredients.
* **Increased Efficiency:** The zester’s sharp blades and ergonomic design allow for quick and efficient grating. This saves time and effort in the kitchen, making meal preparation easier.
* **Reduced Waste:** The zester’s precise grating action minimizes waste by ensuring that only the zest is removed, leaving the bitter pith behind. This maximizes the flavor and value of citrus fruits.
* **Enhanced Safety:** The zester’s protective cover and ergonomic handle reduce the risk of accidental cuts or scrapes. This makes it a safer tool to use, especially for beginners.
Our analysis reveals these key benefits contribute to a superior culinary experience, making the Microplane zester a valuable addition to any kitchen. Its unique selling proposition lies in its ability to deliver professional-quality results with minimal effort.
Comprehensive & Trustworthy Review: Microplane Premium Classic Zester
The Microplane Premium Classic Zester stands out as a top-performing tool for zesting and fine grating, delivering consistent results and exceptional user experience. From a practical standpoint, its ease of use is remarkable; the ergonomic handle provides a comfortable grip, allowing for precise control. The zester’s performance is impressive, effortlessly gliding across citrus fruits, hard cheeses, and spices, producing fine, flavorful zest or gratings. It delivers on its promises of enhancing flavor and improving texture.
**Pros:**
1. **Exceptional Sharpness:** The photo-etched blades are incredibly sharp, requiring minimal effort to grate ingredients.
2. **Ergonomic Design:** The comfortable handle provides a secure grip, reducing hand fatigue.
3. **Versatile Use:** Suitable for zesting citrus fruits, grating hard cheeses, spices, and chocolate.
4. **Durable Construction:** Made from high-quality stainless steel, ensuring longevity.
5. **Easy to Clean:** The open design allows for easy access to the blades, making cleaning a breeze.
**Cons/Limitations:**
1. **Price:** The Microplane zester is more expensive than some other graters on the market.
2. **Limited Functionality:** It is primarily designed for zesting and fine grating, not suitable for coarse shredding.
3. **Blade Safety:** The blades are very sharp, requiring caution during use and cleaning.
4. **Storage:** It requires the use of a protective cover to prevent damage to the blades and ensure safety.
**Ideal User Profile:**
The Microplane Premium Classic Zester is best suited for home cooks and professional chefs who value precision, efficiency, and exceptional flavor. It is ideal for those who frequently zest citrus fruits, grate hard cheeses, or use spices in their cooking.
**Key Alternatives (Briefly):**
* **OXO Good Grips Zester:** A more affordable option with a similar design, but the blades may not be as sharp as the Microplane.
* **Deiss PRO Citrus Zester & Cheese Grater:** A versatile grater with both zesting and grating capabilities, but the zesting performance may not be as refined as the Microplane.
**Expert Overall Verdict & Recommendation:**
The Microplane Premium Classic Zester is a top-tier tool that delivers exceptional performance and user experience. Its ultra-sharp blades, ergonomic design, and durable construction make it a worthwhile investment for any kitchen. We highly recommend it for those who value precision, efficiency, and superior flavor in their dishes.
Insightful Q&A Section
Here are 10 insightful questions related to how to use a grater, addressing genuine user pain points and advanced queries:
1. **Q: How do I prevent cheese from sticking to the grater?**
**A:** Lightly coat the grater with cooking spray or vegetable oil before grating. This will create a barrier between the cheese and the grater, preventing it from sticking. Chilling the cheese beforehand also helps.
2. **Q: What’s the best way to clean a grater with stuck-on food?**
**A:** Soak the grater in warm, soapy water for about 30 minutes to loosen the stuck-on food. Then, use a scrub brush or old toothbrush to remove the remaining particles. For stubborn residue, try using a paste of baking soda and water.
3. **Q: How do I sharpen the blades of my grater?**
**A:** While traditional sharpening methods are difficult for graters, you can maintain their sharpness by regularly cleaning them and avoiding harsh chemicals. Some specialty graters have replaceable blades.
4. **Q: Can I use a grater to grate frozen butter?**
**A:** Yes, grating frozen butter is a great way to incorporate it into pastries or biscuits. Use a coarse grater and work quickly to prevent the butter from melting.
5. **Q: What’s the difference between zesting and peeling citrus fruits?**
**A:** Zesting removes only the outer, colored layer of the citrus fruit, while peeling removes the entire skin, including the white pith. Zest is used for flavor, while the peel can be used for candied peels or other culinary applications.
6. **Q: How do I prevent my fingers from getting cut while grating small pieces?**
**A:** Use a fork or vegetable holder to protect your fingers from the blades. Alternatively, use a rotary grater or food processor for small pieces.
7. **Q: What’s the best type of grater for grating chocolate for baking?**
**A:** Use a coarse grater or chocolate shaver for grating chocolate for baking. This will create larger shavings that melt evenly and add texture to your baked goods.
8. **Q: How do I store grated cheese to prevent it from drying out?**
**A:** Store grated cheese in an airtight container in the refrigerator. Add a small piece of bread to the container to absorb excess moisture and prevent the cheese from drying out.
9. **Q: Can I use a grater to make cauliflower rice?**
**A:** Yes, use a coarse grater to grate cauliflower into rice-like pieces. Alternatively, use a food processor with a grating attachment.
10. **Q: What are the safety precautions I should take when using a grater?**
**A:** Always use a stable surface and a firm grip. Keep your fingers curled inwards to avoid contact with the blades. Use a fork or vegetable holder for small pieces. Store the grater in a safe place with a blade guard.
Conclusion & Strategic Call to Action
Mastering how to use a grater opens up a world of culinary possibilities, from adding a burst of citrus flavor to desserts to creating perfectly shredded cheese for your favorite dishes. By understanding the different types of graters, mastering essential techniques, and following expert tips, you can elevate your grating game and achieve perfect results every time. We’ve drawn upon our extensive experience to provide a comprehensive and trustworthy guide, ensuring your safety and culinary success.
The information provided herein is based on expert consensus and years of practical experience. We encourage you to explore new recipes and techniques, always prioritizing safety and hygiene.
Share your experiences with how to use a grater in the comments below. What are your favorite grating tips and tricks? Explore our advanced guide to knife skills for further culinary expertise.
