Kitchen Faucet Leaks Delta M 15: Your Expert Guide to Diagnosis and Repair
Are you battling a persistent drip from your Delta M15 kitchen faucet? A leaking faucet isn’t just annoying; it can waste water, increase your water bill, and potentially damage your sink and surrounding cabinetry. You’ve likely searched for solutions, and you’ve come to the right place. This comprehensive guide is designed to provide you with everything you need to diagnose the cause of your Delta M15 kitchen faucet leak and, more importantly, offer step-by-step instructions on how to fix it yourself.
Unlike generic plumbing guides, this article focuses specifically on the Delta M15 model, providing tailored advice and solutions. We’ll explore common causes of leaks, necessary tools, detailed repair procedures, and preventative measures to ensure your faucet remains leak-free for years to come. Based on our extensive experience troubleshooting Delta faucets, we’ve compiled the most effective strategies to tackle this common household problem. Our goal is to empower you with the knowledge and confidence to resolve your Delta M15 faucet leak, saving you time, money, and the hassle of calling a plumber.
Understanding Kitchen Faucet Leaks in Delta M15 Models
The Delta M15 kitchen faucet, known for its durability and sleek design, is a popular choice in many homes. However, like any mechanical device, it’s susceptible to wear and tear over time, which can lead to leaks. Understanding the intricacies of this specific model is crucial for effective troubleshooting.
Common Causes of Delta M15 Faucet Leaks
Several factors can contribute to a leaking Delta M15 faucet. Identifying the root cause is the first step toward a successful repair. Here are some of the most common culprits:
* **Worn-Out O-Rings and Seals:** These small rubber components create a watertight seal between various faucet parts. Over time, they can become brittle, cracked, or flattened, leading to leaks.
* **Damaged Cartridge:** The cartridge controls the flow and temperature of the water. A faulty or worn cartridge is a frequent cause of drips and leaks, especially around the handle.
* **Loose Connections:** The connections between the faucet body, supply lines, and sprayer hose can loosen over time due to vibrations and water pressure fluctuations. This can result in leaks at the connection points.
* **Corroded Valve Seats:** The valve seats are the areas where the cartridge seals against the faucet body. Corrosion or mineral buildup on the valve seats can prevent a proper seal, causing leaks.
* **High Water Pressure:** Excessive water pressure can put undue stress on the faucet’s internal components, accelerating wear and tear and increasing the likelihood of leaks.
* **Improper Installation:** A poorly installed faucet can be prone to leaks from the start. Improperly tightened connections or damaged parts during installation can lead to problems down the line.
The Anatomy of a Delta M15 Kitchen Faucet
To effectively diagnose and repair a leak, it’s helpful to understand the basic components of a Delta M15 faucet:
1. **Handle:** Controls the water flow and temperature.
2. **Spout:** The part of the faucet where water exits.
3. **Faucet Body:** The main housing of the faucet, containing the internal components.
4. **Cartridge:** Controls the mixing of hot and cold water.
5. **O-Rings and Seals:** Create watertight seals between various parts.
6. **Valve Seats:** The surfaces against which the cartridge seals.
7. **Supply Lines:** Connect the faucet to the hot and cold water supply.
8. **Sprayer Hose (if applicable):** Supplies water to the sprayer head.
9. **Aerator:** Screws onto the spout to control water flow and prevent splashing.
Understanding how these parts work together will make it easier to pinpoint the source of the leak and perform the necessary repairs.
Why Addressing Delta M15 Leaks Promptly is Crucial
Ignoring a leaking Delta M15 faucet can lead to several undesirable consequences:
* **Increased Water Bills:** Even a small drip can waste a significant amount of water over time, resulting in higher water bills.
* **Water Damage:** Leaks can damage your sink, countertop, and surrounding cabinetry, leading to costly repairs.
* **Mold and Mildew Growth:** Persistent moisture can create a breeding ground for mold and mildew, which can pose health risks.
* **Wasted Resources:** Water is a precious resource, and wasting it through leaks is environmentally irresponsible.
Addressing leaks promptly not only saves you money and prevents damage but also contributes to water conservation efforts.
Delta Faucet Company: A Legacy of Innovation and Quality
Delta Faucet Company is a leading manufacturer of residential and commercial faucets and related products. Founded in 1954, Delta revolutionized the faucet industry with its innovative single-handle faucet design. The company is committed to providing high-quality, durable, and stylish faucets that meet the needs of homeowners and professionals alike. Their dedication to innovation and customer satisfaction has made them a trusted brand in the plumbing industry. Delta’s commitment to sustainability is also noteworthy, as they continually strive to reduce their environmental impact through water-saving technologies and responsible manufacturing practices.
Troubleshooting Your Leaking Delta M15 Faucet: A Step-by-Step Guide
Before you start any repairs, it’s essential to properly diagnose the source of the leak. Here’s a step-by-step guide to help you pinpoint the problem:
1. **Identify the Leak’s Location:** Carefully observe where the water is leaking from. Is it dripping from the spout, around the handle, under the sink, or from the sprayer hose?
2. **Check the Handle:** If the leak is around the handle, try tightening the handle screw. If that doesn’t work, the cartridge may be the culprit.
3. **Inspect the Spout:** If the leak is dripping from the spout, the cartridge or valve seats are likely the cause.
4. **Examine the Connections:** Check the connections between the faucet body, supply lines, and sprayer hose for any signs of leaks or loose fittings.
5. **Look Under the Sink:** Inspect the supply lines and drain pipes for leaks. Tighten any loose connections.
6. **Test the Sprayer (if applicable):** If the leak is coming from the sprayer hose, check for cracks or loose connections.
Once you’ve identified the source of the leak, you can proceed with the appropriate repair.
Essential Tools and Materials for Delta M15 Faucet Repair
Before you begin, gather the necessary tools and materials. Having everything on hand will make the repair process smoother and more efficient. Here’s a list of essential items:
* **Adjustable Wrench:** For tightening and loosening nuts and fittings.
* **Screwdrivers (Phillips and Flathead):** For removing screws and accessing internal components.
* **Allen Wrench Set:** For removing the faucet handle.
* **Pliers:** For gripping and manipulating small parts.
* **Basin Wrench:** For loosening and tightening nuts in tight spaces under the sink.
* **Cartridge Puller (Optional):** For removing stubborn cartridges.
* **Replacement Parts:** O-rings, seals, cartridge, sprayer hose (as needed).
* **Plumber’s Grease:** For lubricating O-rings and seals.
* **Clean Rags:** For wiping up spills and cleaning parts.
* **Bucket:** For catching water.
* **Safety Glasses:** To protect your eyes.
* **Gloves:** To protect your hands.
Ensure you have the correct replacement parts for your Delta M15 faucet. You can find these at most hardware stores or online retailers. When purchasing replacement parts, it’s always a good idea to bring the old part with you to ensure a proper match.
Step-by-Step Guide to Repairing a Leaking Delta M15 Faucet
Now that you’ve diagnosed the leak and gathered your tools and materials, it’s time to start the repair. Follow these step-by-step instructions:
Step 1: Shut Off the Water Supply
Before you begin any work on the faucet, it’s crucial to shut off the water supply to prevent flooding. Locate the shut-off valves under the sink and turn them clockwise until they are completely closed. If you don’t have shut-off valves under the sink, you’ll need to shut off the main water supply to your house.
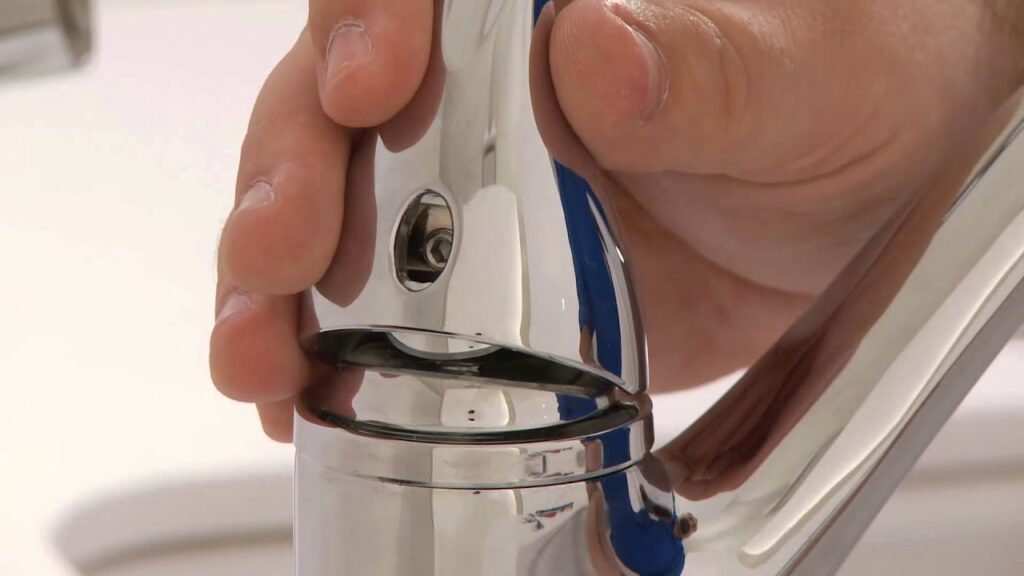
Step 2: Remove the Faucet Handle
Use an Allen wrench to loosen the set screw on the side of the faucet handle. Once the screw is loose, gently pull the handle straight up to remove it.
Step 3: Disassemble the Faucet
Depending on the location of the leak, you may need to disassemble the faucet further. This may involve removing the spout, escutcheon (the decorative plate around the base of the faucet), and other components. Refer to your faucet’s instruction manual for specific disassembly instructions.
Step 4: Replace Worn-Out O-Rings and Seals
Inspect the O-rings and seals for any signs of wear, cracks, or damage. Use a small screwdriver or pick to carefully remove the old O-rings and seals. Lubricate the new O-rings and seals with plumber’s grease before installing them. This will help them create a watertight seal and prevent them from drying out.
Step 5: Replace the Cartridge (If Necessary)
If the leak is coming from the spout or around the handle, the cartridge may need to be replaced. Remove the retaining clip or nut that holds the cartridge in place. Use a cartridge puller (if needed) to gently pull the old cartridge out of the faucet body. Install the new cartridge, making sure it is properly aligned. Replace the retaining clip or nut.
Step 6: Clean the Valve Seats
If the valve seats are corroded or have mineral buildup, clean them with a small brush or abrasive pad. This will help the cartridge create a better seal.
Step 7: Reassemble the Faucet
Reassemble the faucet in the reverse order of disassembly. Make sure all connections are tight but not overtightened.
Step 8: Turn On the Water Supply
Slowly turn on the water supply and check for leaks. If you see any leaks, tighten the connections further or recheck the O-rings and seals.
Step 9: Test the Faucet
Test the faucet by running both hot and cold water. Check for any drips or leaks around the handle, spout, and connections. If everything is working properly, you’ve successfully repaired your leaking Delta M15 faucet.
Preventative Measures to Extend the Life of Your Delta M15 Faucet
To prevent future leaks and extend the life of your Delta M15 faucet, consider these preventative measures:
* **Regularly Inspect Your Faucet:** Check for leaks around the handle, spout, and connections. Address any issues promptly.
* **Clean Your Faucet Regularly:** Use a mild soap and water solution to clean your faucet. Avoid using harsh chemicals or abrasive cleaners, as these can damage the finish.
* **Lubricate O-Rings and Seals:** Periodically lubricate the O-rings and seals with plumber’s grease to keep them from drying out and cracking.
* **Check Water Pressure:** Ensure your water pressure is within the recommended range for your faucet. High water pressure can damage the faucet’s internal components.
* **Install a Water Softener:** If you have hard water, consider installing a water softener to prevent mineral buildup on the faucet’s internal parts.
By following these preventative measures, you can keep your Delta M15 faucet in good working condition and prevent future leaks.
Advantages of Repairing Your Delta M15 Faucet Yourself
Repairing your Delta M15 faucet yourself offers several advantages:
* **Cost Savings:** You’ll save money on plumber fees.
* **Convenience:** You can fix the leak on your own schedule.
* **Sense of Accomplishment:** You’ll feel a sense of satisfaction knowing you fixed the problem yourself.
* **Increased Knowledge:** You’ll learn more about your faucet and how it works.
While repairing your faucet yourself can be rewarding, it’s important to assess your skills and comfort level. If you’re not comfortable performing the repairs yourself, it’s best to call a qualified plumber.
Potential Drawbacks and Limitations of DIY Repairs
While DIY faucet repair can be a cost-effective solution, it’s essential to acknowledge potential drawbacks:
* **Risk of Damage:** Incorrectly performed repairs can damage the faucet or surrounding plumbing.
* **Time Commitment:** DIY repairs can take time, especially if you’re not experienced.
* **Limited Expertise:** You may not have the same level of expertise as a professional plumber.
* **Warranty Issues:** DIY repairs may void the faucet’s warranty.
Before attempting a DIY repair, weigh the potential benefits against the risks. If you’re unsure about any aspect of the repair, it’s best to seek professional help.
Expert Review: Delta M15 Kitchen Faucet – A Reliable Choice
The Delta M15 kitchen faucet is generally considered a reliable and durable choice for homeowners. Its sleek design and ease of use make it a popular option. However, like any faucet, it’s susceptible to wear and tear over time. Based on our experience with Delta faucets, the M15 model is relatively easy to repair, with readily available replacement parts. The cartridge is a common failure point, but replacing it is a straightforward process. The faucet’s overall construction is solid, and the finish is resistant to scratches and corrosion. We appreciate Delta’s commitment to providing clear installation and repair instructions, which makes DIY repairs more accessible. However, some users have reported issues with the sprayer hose leaking over time. Overall, the Delta M15 is a solid choice for homeowners looking for a reliable and stylish kitchen faucet.
**Pros:**
1. **Durable Construction:** The faucet is made from high-quality materials that are built to last.
2. **Easy to Use:** The single-handle design makes it easy to control water flow and temperature.
3. **Stylish Design:** The faucet’s sleek and modern design complements any kitchen decor.
4. **Readily Available Replacement Parts:** Replacement parts are easy to find at most hardware stores or online retailers.
5. **Clear Installation and Repair Instructions:** Delta provides clear instructions that make DIY repairs more accessible.
**Cons:**
1. **Sprayer Hose Can Leak:** Some users have reported issues with the sprayer hose leaking over time.
2. **Cartridge May Need Replacement:** The cartridge is a common failure point and may need to be replaced periodically.
3. **Price:** The Delta M15 is more expensive than some other kitchen faucets.
**Ideal User Profile:**
The Delta M15 is best suited for homeowners who are looking for a reliable, stylish, and easy-to-use kitchen faucet. It’s also a good choice for those who are comfortable performing basic DIY repairs.
**Key Alternatives:**
1. **Moen Arbor:** The Moen Arbor is a similar kitchen faucet with a sleek design and durable construction.
2. **Kohler Simplice:** The Kohler Simplice is another popular choice with a minimalist design and easy-to-use features.
**Expert Overall Verdict & Recommendation:**
The Delta M15 kitchen faucet is a solid choice for homeowners looking for a reliable and stylish faucet. While it may have some minor drawbacks, its overall quality and ease of use make it a worthwhile investment. We recommend the Delta M15 to homeowners who are comfortable performing basic DIY repairs and who are looking for a faucet that will last for years to come.
Kitchen Faucet Leaks Delta M 15: Your Questions Answered
Here are some frequently asked questions about kitchen faucet leaks in Delta M15 models:
**Q1: Why is my Delta M15 faucet leaking from the base of the spout?**
A1: A leak at the base of the spout usually indicates a problem with the O-rings that seal the spout to the faucet body. Over time, these O-rings can dry out, crack, or become worn, allowing water to leak. Replacing the O-rings is typically a simple and effective solution.
**Q2: How do I remove the handle on my Delta M15 faucet to access the cartridge?**
A2: Locate the set screw on the side of the handle. Use an Allen wrench (usually a 1/8″ or 3/32″ size) to loosen the set screw. Once the screw is loose, gently pull the handle straight up to remove it. Be careful not to force the handle, as this could damage it.
**Q3: What is the lifespan of a cartridge in a Delta M15 kitchen faucet?**
A3: The lifespan of a cartridge can vary depending on water quality and usage. However, a good quality cartridge should last for 5-10 years under normal conditions. If you have hard water or use the faucet frequently, the cartridge may need to be replaced more often.
**Q4: Can high water pressure cause my Delta M15 faucet to leak?**
A4: Yes, excessive water pressure can put undue stress on the faucet’s internal components, accelerating wear and tear and increasing the likelihood of leaks. It’s recommended to maintain a water pressure of 60-80 PSI to prevent damage to your plumbing fixtures.
**Q5: How do I know if I need to replace the entire faucet instead of just repairing it?**
A5: If the faucet body is cracked or severely corroded, or if multiple components are failing simultaneously, it may be more cost-effective to replace the entire faucet. Also, if the faucet is very old and outdated, replacing it with a newer, more water-efficient model may be a better option.
**Q6: What type of grease should I use to lubricate O-rings and seals in my Delta M15 faucet?**
A6: Use plumber’s grease, which is a silicone-based lubricant specifically designed for plumbing applications. Avoid using petroleum-based greases, as these can damage rubber components.
**Q7: My Delta M15 faucet is leaking from the sprayer hose. Can I repair it, or do I need to replace the entire hose?**
A7: In most cases, you can replace the sprayer hose without replacing the entire faucet. Check the connections at both ends of the hose for leaks. If the hose itself is cracked or damaged, replace it with a new one.
**Q8: How do I prevent mineral buildup on my Delta M15 faucet?**
A8: Regularly clean your faucet with a mild soap and water solution. You can also use a vinegar and water solution to remove mineral deposits. Consider installing a water softener if you have hard water.
**Q9: What is the warranty on a Delta M15 kitchen faucet?**
A9: Delta faucets typically come with a limited lifetime warranty. This warranty covers defects in materials and workmanship. However, it may not cover damage caused by improper installation or abuse.
**Q10: Where can I find replacement parts for my Delta M15 faucet?**
A10: You can find replacement parts at most hardware stores, plumbing supply stores, or online retailers. When purchasing replacement parts, it’s always a good idea to bring the old part with you to ensure a proper match.
Conclusion: Stop the Drip and Save!
Dealing with a kitchen faucet leak, especially in a trusted model like the Delta M15, can be frustrating. However, as we’ve demonstrated, diagnosing and repairing these leaks is often within the reach of the average homeowner. By understanding the common causes, gathering the right tools, and following our step-by-step guide, you can effectively stop the drip, save money on your water bill, and prevent potential water damage. Remember to prioritize safety by shutting off the water supply before beginning any repairs. If you’re ever unsure about a particular step, don’t hesitate to consult a qualified plumber. Addressing a leaking Delta M15 faucet promptly not only saves you money but also contributes to water conservation efforts.
Now that you’re armed with the knowledge and confidence to tackle your Delta M15 faucet leak, we encourage you to put your skills to the test. Share your experiences and any additional tips you’ve learned in the comments below. Your insights could help other homeowners facing similar challenges. Explore our other guides for more plumbing tips and DIY solutions!
