How to Fix a Leaking Sink Outlet: A Comprehensive Guide
A leaking sink outlet can be a frustrating and potentially damaging problem. Not only does it waste water, but it can also lead to water damage under your sink, fostering mold growth and even affecting the structural integrity of your cabinetry. Understanding how to diagnose and address a leaking sink outlet is a valuable skill for any homeowner. This comprehensive guide provides step-by-step instructions and expert tips to help you tackle this common plumbing issue efficiently and effectively. We’ll cover everything from identifying the source of the leak to replacing worn-out parts, ensuring a watertight seal and preventing future problems.
Understanding the Sink Outlet Assembly
Before diving into the repair process, it’s important to understand the components of a typical sink outlet assembly. This will help you pinpoint the exact location of the leaking sink outlet and choose the right course of action. The main parts include:
- Sink Flange: The metal or plastic ring that sits flush against the sink basin and is secured with putty or sealant.
- Drain Body: The main housing of the outlet, connecting the sink flange to the tailpiece.
- Tailpiece: The pipe that extends downward from the drain body, connecting to the P-trap.
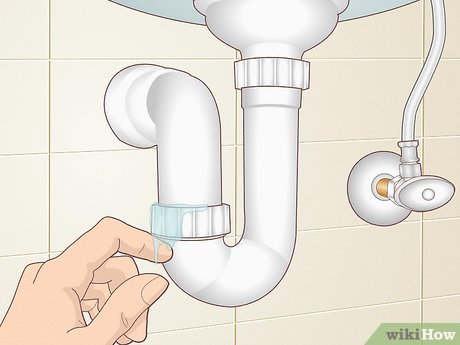
- P-trap: The U-shaped pipe designed to trap debris and prevent sewer gases from entering your home.
- Slip Nuts and Washers: Used to create watertight connections between the various components.
Identifying the Source of the Leak
The first step in fixing a leaking sink outlet is to identify the source of the leak. This may seem obvious, but a careful inspection can save you time and effort. Common leak locations include:
- Around the Sink Flange: This often indicates a problem with the plumber’s putty or sealant.
- At the Slip Nut Connections: Loose or worn-out washers are usually the culprit.
- From the Drain Body: Cracks or corrosion in the drain body itself may require replacement.
- From the Tailpiece: Similar to the drain body, cracks or corrosion can cause leaks.
To pinpoint the leak, dry all the components thoroughly with a clean cloth. Then, slowly run water into the sink and observe where the first drops appear. Use a flashlight to get a better view of hard-to-reach areas.
Tools and Materials You’ll Need
Before you start, gather the necessary tools and materials. Having everything on hand will make the repair process smoother and more efficient. Here’s a list of essentials:
- Basin Wrench: For loosening and tightening nuts in tight spaces.
- Adjustable Wrench: For general tightening and loosening tasks.
- Plumber’s Putty: For sealing the sink flange to the sink basin.
- Silicone Caulk: An alternative to plumber’s putty, providing a flexible and watertight seal.
- Screwdrivers (Phillips and Flathead): For removing and tightening screws.
- Pliers: For gripping and manipulating small parts.
- Bucket: To catch water during disassembly.
- Clean Cloths or Rags: For cleaning and drying components.
- Replacement Parts: Such as washers, slip nuts, tailpieces, or even a complete drain assembly, depending on the source of the leaking sink outlet.
- Gloves: To protect your hands.
Step-by-Step Guide to Fixing a Leaking Sink Outlet
Now that you’ve identified the source of the leak and gathered your tools, let’s get to the repair process. Follow these step-by-step instructions carefully:
Step One: Prepare the Work Area
Clear the area under the sink and place a bucket underneath the drain assembly to catch any remaining water. Turn off the water supply to the sink by closing the shut-off valves located under the sink. If you don’t have shut-off valves, you’ll need to turn off the main water supply to your house.
Step Two: Disassemble the Drain Assembly
Loosen the slip nuts connecting the tailpiece to the P-trap and the drain body. Use a basin wrench or adjustable wrench if necessary. Carefully detach the tailpiece and P-trap, allowing any remaining water to drain into the bucket. Next, loosen the slip nut connecting the drain body to the sink flange. You may need to use a basin wrench to reach this nut. Once the nut is loose, you should be able to remove the drain body from the sink flange.
Step Three: Inspect and Clean the Components
Thoroughly inspect all the components for cracks, corrosion, or damage. Pay close attention to the washers and slip nuts. Clean all parts with a clean cloth to remove any debris or buildup. If you find any damaged parts, replace them with new ones. If the leaking sink outlet is due to a corroded drain body, consider replacing the entire drain assembly.
Step Four: Reapply Plumber’s Putty or Silicone Caulk
If the leak was coming from around the sink flange, remove any old plumber’s putty or silicone caulk from the flange and the sink basin. Clean the area thoroughly. Roll a rope of fresh plumber’s putty and apply it evenly around the underside of the sink flange. Alternatively, apply a bead of silicone caulk around the underside of the flange. Make sure the putty or caulk creates a complete seal.
Step Five: Reassemble the Drain Assembly
Carefully insert the sink flange into the sink basin, pressing down firmly to ensure a good seal. From underneath the sink, reattach the drain body to the sink flange and tighten the slip nut. Be careful not to overtighten, as this can damage the drain body or the sink flange. Reattach the tailpiece and P-trap, tightening the slip nuts securely. Make sure all connections are snug but not overly tight.
Step Six: Test for Leaks
Turn the water supply back on slowly and check for leaks. Run water into the sink and observe all the connections carefully. If you see any leaks, tighten the slip nuts slightly or reapply plumber’s putty or silicone caulk as needed. If the leaking sink outlet persists, you may need to disassemble the drain assembly again and inspect the components more closely.
Troubleshooting Common Problems
Even with careful attention to detail, you may encounter some common problems when fixing a leaking sink outlet. Here are a few troubleshooting tips:
- Persistent Leaks: If you’ve tightened all the connections and reapplied plumber’s putty or silicone caulk, but the leak persists, check for cracks or corrosion in the drain body or tailpiece. These components may need to be replaced.
- Stripped Threads: If you’re having trouble tightening a slip nut, the threads may be stripped. Replace the slip nut with a new one.
- Difficulty Removing Old Parts: If you’re having trouble removing old parts, try using a penetrating oil to loosen them. Let the oil sit for a few minutes before attempting to remove the parts again.
- Incorrectly Sized Parts: Ensure all replacement parts are the correct size for your sink and drain assembly. Using the wrong size parts can lead to leaks and other problems.
Preventing Future Leaks
Once you’ve fixed the leaking sink outlet, take steps to prevent future leaks. Here are a few tips:
- Regularly Inspect Your Plumbing: Check under your sink regularly for any signs of leaks or corrosion.
- Avoid Harsh Chemicals: Harsh chemicals can damage your plumbing and lead to leaks. Use gentle cleaning products instead.
- Don’t Overload Your Sink: Avoid overloading your sink with heavy items, as this can put stress on the drain assembly.
- Proper Installation: When installing a new sink or drain assembly, make sure to follow the manufacturer’s instructions carefully.
When to Call a Professional Plumber
While many leaking sink outlet repairs can be handled by homeowners, there are times when it’s best to call a professional plumber. Consider calling a plumber if:
- You’re not comfortable working with plumbing.
- You’ve tried to fix the leak yourself, but it persists.
- You suspect there may be a more serious plumbing problem.
- You’re dealing with a complex drain assembly or plumbing system.
A professional plumber has the expertise and tools to diagnose and repair plumbing problems quickly and efficiently. They can also help you prevent future problems and ensure that your plumbing system is functioning properly. Addressing a leaking sink outlet promptly, whether through DIY repair or professional assistance, is crucial for maintaining the integrity of your home and preventing costly water damage. [See also: Replacing a Kitchen Sink Drain] [See also: Understanding Different Types of Sink Drains]
