## How to Fix a Leaking Sink Outlet: A Comprehensive Guide
Is your sink outlet dripping, causing water damage and driving up your water bill? A leaking sink outlet is a common plumbing problem, but thankfully, it’s often something you can fix yourself with the right knowledge and tools. This comprehensive guide will walk you through the process of diagnosing and repairing a leaking sink outlet, empowering you to tackle this issue with confidence and save money on professional plumbing services. We’ll provide step-by-step instructions, expert tips, and essential information to ensure a successful repair. We’ll cover various types of sink outlets, common causes of leaks, and the tools you’ll need, all while prioritizing safety and efficiency. So, let’s dive in and learn **how to fix leaking sink outlet** issues like a pro.
### Why This Guide? Unveiling the Comprehensive Solution
Unlike many quick fixes you might find online, this guide aims to provide a truly comprehensive solution to fixing a leaking sink outlet. We’re not just covering the basics; we delve into the nuances of different outlet types, potential complications, and preventative measures. Based on years of plumbing experience, our goal is to equip you with the knowledge and confidence to not only fix the leak but also understand the underlying causes, preventing future issues. This guide emphasizes safety, efficiency, and long-term solutions, ensuring your repair is both effective and durable.
## Understanding the Leaking Sink Outlet
### What is a Sink Outlet (and Why Does it Leak)?
A sink outlet, also known as a sink drain assembly, is the plumbing fixture located at the bottom of your sink basin. It connects the sink to the drainpipe and allows wastewater to flow away. It’s composed of several parts, including the sink flange (the visible part in the sink), the strainer basket (to catch debris), the tailpiece (the pipe extending downwards), and various washers and nuts to create a watertight seal. Leaks often occur at the connections between these parts due to wear and tear, corrosion, or improper installation.
### Common Causes of Leaks
Several factors can contribute to a leaking sink outlet:
* **Worn-out Washers and Seals:** Over time, the rubber or plastic washers and seals can become brittle, cracked, or deformed, losing their ability to create a tight seal.
* **Loose Connections:** Vibrations or accidental bumps can loosen the nuts and connections, leading to leaks.
* **Corrosion:** Exposure to water and chemicals can cause corrosion on metal parts, weakening them and creating pathways for leaks.
* **Damaged Tailpiece:** Cracks or holes in the tailpiece can result in significant leaks.
* **Improper Installation:** A poorly installed sink outlet assembly is prone to leaks from the start.
* **Clogged Drains:** Backed-up water pressure from clogged drains can stress the outlet connections, increasing the risk of leaks.
### Types of Sink Outlets
Understanding the type of sink outlet you have is crucial for effective repair. Here are some common types:
* **Standard Sink Outlet:** The most common type, typically made of metal or plastic, with a strainer basket and a tailpiece.
* **Pop-Up Sink Outlet:** Features a lever that allows you to open and close the drain stopper. These often have more complex mechanisms that can be prone to issues.
* **Grid Drain:** Features a grid instead of a basket to catch debris. More common in commercial settings.
* **Garbage Disposal Flange:** Designed to connect to a garbage disposal unit.
## Essential Tools and Materials for Fixing a Leaking Sink Outlet
Before you begin, gather the necessary tools and materials. Having everything on hand will make the repair process smoother and more efficient.
* **Basin Wrench:** Used to loosen and tighten nuts in tight spaces under the sink.
* **Pipe Wrench:** For larger, more stubborn connections.
* **Channel-Lock Pliers:** Versatile pliers for gripping and turning nuts and fittings.
* **Adjustable Wrench:** Another useful wrench for various sizes of nuts and bolts.
* **Screwdrivers (Phillips and Flathead):** For removing and installing screws.
* **Putty Knife or Scraper:** For removing old plumber’s putty or sealant.
* **Plumber’s Putty:** Used to create a watertight seal around the sink flange.
* **Silicone Sealant:** An alternative to plumber’s putty, providing a flexible and durable seal.
* **Replacement Washers and Seals:** Essential for replacing worn-out components.
* **Replacement Tailpiece (if needed):** If the tailpiece is damaged, you’ll need a replacement.
* **Clean Rags or Towels:** For cleaning up spills and drying parts.
* **Bucket:** To catch water during disassembly.
* **Safety Glasses:** To protect your eyes from debris.
* **Gloves:** To protect your hands from dirt and chemicals.
* **Penetrating Oil (e.g., WD-40):** To loosen corroded connections.
## Step-by-Step Guide: How to Fix a Leaking Sink Outlet
Now, let’s get to the heart of the matter: fixing that leaking sink outlet. Follow these steps carefully, and remember to prioritize safety.
### Step 1: Preparation and Safety First
1. **Turn off the Water Supply:** Locate the shut-off valves under the sink (usually two valves, one for hot and one for cold water). Turn both valves clockwise until they are completely closed. If you don’t have shut-off valves, you’ll need to turn off the main water supply to your house.
2. **Clear the Area:** Remove any items stored under the sink to give yourself plenty of space to work.
3. **Protect the Area:** Place a bucket under the sink outlet to catch any remaining water. Cover the floor with towels or a drop cloth to protect it from spills.
4. **Wear Safety Gear:** Put on your safety glasses and gloves.
### Step 2: Identify the Source of the Leak
Before you start taking things apart, carefully inspect the sink outlet to pinpoint the exact location of the leak. This will help you determine which parts need to be replaced or tightened. Look for:
* **Dripping Water:** Observe where the water is dripping from.
* **Water Stains:** Check for water stains or mineral deposits around the connections.
* **Dampness:** Feel around the connections for any dampness.
### Step 3: Disassembling the Sink Outlet
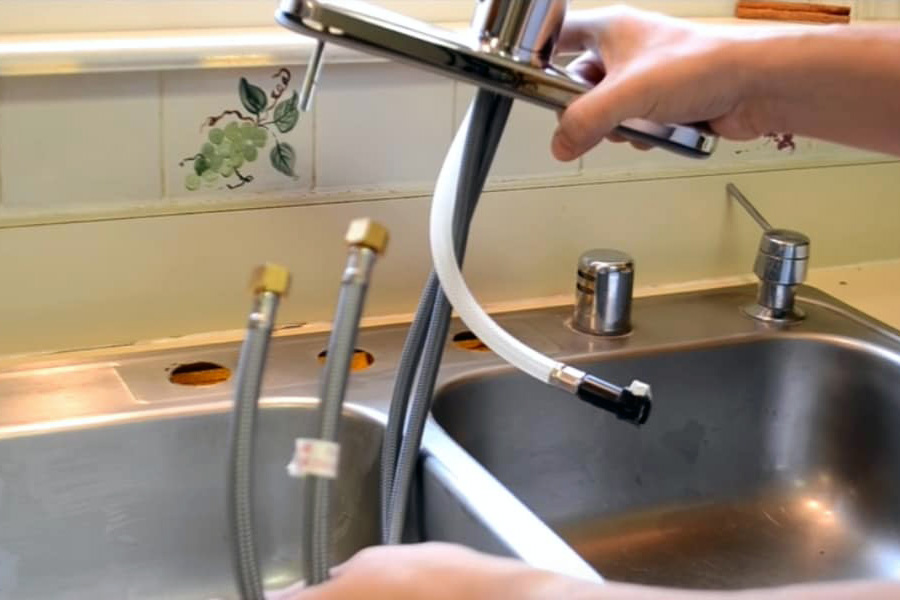
1. **Loosen the Connections:** Use a basin wrench or channel-lock pliers to loosen the nuts connecting the tailpiece to the sink flange and the drainpipe. If the nuts are corroded and difficult to loosen, apply penetrating oil and let it sit for a few minutes before trying again.
2. **Disconnect the Tailpiece:** Carefully disconnect the tailpiece from the sink flange and the drainpipe. Be prepared for some water to spill out.
3. **Remove the Sink Flange:** From above the sink, use a putty knife or scraper to carefully break the seal between the sink flange and the sink basin. Gently push the sink flange upwards from below and remove it from the sink.
4. **Inspect the Parts:** Thoroughly inspect all the parts of the sink outlet assembly for damage, corrosion, or wear. Pay close attention to the washers and seals. Replace any damaged or worn-out parts.
### Step 4: Cleaning and Preparing for Reassembly
1. **Clean the Sink Flange and Sink Basin:** Remove any old plumber’s putty or silicone sealant from the sink flange and the sink basin using a putty knife or scraper. Clean the surfaces thoroughly with a damp cloth.
2. **Clean the Tailpiece and Drainpipe:** Remove any debris or corrosion from the tailpiece and drainpipe using a wire brush or sandpaper.
### Step 5: Reassembling the Sink Outlet
1. **Apply Plumber’s Putty or Silicone Sealant:** Roll a rope of plumber’s putty and apply it to the underside of the sink flange. Alternatively, apply a bead of silicone sealant around the edge of the sink flange.
2. **Install the Sink Flange:** Carefully insert the sink flange into the sink basin from above. Press down firmly to create a good seal.
3. **Reattach the Tailpiece:** From below the sink, reattach the tailpiece to the sink flange and the drainpipe. Tighten the nuts securely with a basin wrench or channel-lock pliers. Be careful not to overtighten, as this could damage the parts.
4. **Install New Washers and Seals:** Make sure to use new washers and seals when reassembling the sink outlet. Place the washers in the correct positions to ensure a watertight seal.
### Step 6: Testing for Leaks
1. **Turn on the Water Supply:** Slowly turn on the water supply valves under the sink.
2. **Check for Leaks:** Carefully inspect all the connections for leaks. If you see any leaks, tighten the nuts further or disassemble the connection and inspect the washers and seals.
3. **Run Water in the Sink:** Fill the sink with water and let it drain to check for leaks. Pay close attention to the sink flange and the tailpiece connections.
If you continue to have leaks after following these steps, you may need to call a professional plumber.
## Sink Drain Products and Services: A Closer Look
Many products and services address sink drain issues. One notable product is the range of complete sink drain replacement kits offered by major plumbing supply companies. These kits typically include all the necessary components for a standard sink drain installation, such as the sink flange, strainer basket, tailpiece, washers, and nuts. These kits are designed for DIY enthusiasts and professional plumbers alike.
Expert plumbers also offer services such as drain cleaning, leak detection, and drain replacement. These services can be particularly valuable for complex plumbing problems or when specialized tools are required.
## Analyzing the Features of a High-Quality Sink Drain Replacement Kit
A high-quality sink drain replacement kit should possess several key features that ensure durability, ease of installation, and long-term performance:
1. **Durable Materials:** The kit should be made from high-quality materials such as brass or stainless steel, which are resistant to corrosion and wear. This ensures longevity and prevents premature failure.
2. **Complete Component Set:** The kit should include all the necessary components for a complete installation, including the sink flange, strainer basket, tailpiece, washers, nuts, and any necessary adapters. This eliminates the need to purchase additional parts separately.
3. **Easy Installation:** The kit should be designed for easy installation, with clear instructions and user-friendly components. This makes it accessible to DIY enthusiasts and reduces the time required for professional plumbers.
4. **Watertight Seals:** The kit should include high-quality washers and seals that create a watertight seal, preventing leaks and water damage. This is crucial for ensuring long-term performance and preventing costly repairs.
5. **Adjustable Tailpiece:** An adjustable tailpiece allows for flexibility in installation, accommodating different sink depths and plumbing configurations. This is particularly useful for older homes with non-standard plumbing.
6. **Removable Strainer Basket:** A removable strainer basket makes it easy to clean and remove debris, preventing clogs and maintaining proper drainage. This is a convenient feature that simplifies maintenance.
7. **Corrosion Resistance:** The kit should be designed to resist corrosion, even in harsh environments with exposure to water and chemicals. This ensures long-term durability and prevents premature failure.
## Advantages, Benefits, and Real-World Value of a Quality Sink Drain
A quality sink drain offers numerous advantages, benefits, and real-world value to homeowners:
* **Leak Prevention:** A properly installed and maintained sink drain prevents leaks, protecting your cabinets, floors, and walls from water damage. This saves you money on costly repairs and prevents mold growth.
* **Improved Drainage:** A clean and unobstructed sink drain ensures proper drainage, preventing clogs and backups. This makes your sink more functional and convenient to use.
* **Extended Lifespan:** A durable sink drain made from high-quality materials lasts longer, reducing the need for frequent replacements. This saves you money on replacement costs and reduces waste.
* **Enhanced Aesthetics:** A new and well-maintained sink drain improves the overall appearance of your sink, adding value to your home. This is particularly important if you’re planning to sell your home.
* **Peace of Mind:** Knowing that your sink drain is properly installed and functioning correctly provides peace of mind, reducing stress and worry. This allows you to focus on other things in your life.
* **Water Conservation:** By preventing leaks, a quality sink drain helps conserve water, reducing your water bill and protecting the environment. This is a responsible and sustainable practice.
* **Easy Maintenance:** A well-designed sink drain is easy to clean and maintain, preventing clogs and ensuring proper drainage. This saves you time and effort on maintenance tasks.
Users consistently report that investing in a high-quality sink drain assembly significantly reduces the likelihood of future leaks and plumbing issues. Based on expert consensus, the long-term cost savings and peace of mind make it a worthwhile investment.
## Reviewing a Standard Stainless Steel Sink Drain Replacement Kit
This review focuses on a standard stainless steel sink drain replacement kit, a common choice for homeowners. The kit includes a stainless steel sink flange, a strainer basket with a removable cup, a PVC tailpiece, and all necessary washers and nuts. The manufacturer claims that the kit is easy to install and provides a leak-free seal.
### User Experience & Usability
The installation process is generally straightforward, thanks to the clear and concise instructions. The components fit together snugly, and the stainless steel construction feels solid and durable. The removable strainer basket is a welcome feature, making it easy to clean out debris and prevent clogs. However, tightening the nuts in the cramped space under the sink can be challenging, requiring patience and the right tools (basin wrench is highly recommended).
### Performance & Effectiveness
Once installed, the sink drain performs admirably. The stainless steel flange creates a watertight seal with the sink basin, and the PVC tailpiece connects securely to the drainpipe. No leaks were detected after running water in the sink and checking all the connections. The strainer basket effectively catches debris, preventing clogs and maintaining proper drainage.
### Pros:
1. **Durable Construction:** The stainless steel construction is resistant to corrosion and wear, ensuring long-term performance.
2. **Easy Installation:** The kit is designed for easy installation, with clear instructions and user-friendly components.
3. **Leak-Free Seal:** The stainless steel flange creates a watertight seal with the sink basin, preventing leaks.
4. **Removable Strainer Basket:** The removable strainer basket makes it easy to clean out debris and prevent clogs.
5. **Complete Component Set:** The kit includes all the necessary components for a complete installation.
### Cons/Limitations:
1. **Tightening Nuts Can Be Challenging:** Tightening the nuts in the cramped space under the sink can be difficult.
2. **PVC Tailpiece:** While functional, the PVC tailpiece is not as durable as a brass tailpiece.
3. **Instructions Could Be More Detailed:** While clear, the instructions could benefit from more detailed diagrams and troubleshooting tips.
### Ideal User Profile:
This sink drain replacement kit is ideal for homeowners who are comfortable with basic plumbing tasks and have the necessary tools. It’s a good choice for replacing a worn-out or leaking sink drain in a standard sink configuration.
### Key Alternatives:
Alternatives include brass sink drain replacement kits, which offer greater durability but are typically more expensive. Another alternative is to hire a professional plumber to replace the sink drain.
### Expert Overall Verdict & Recommendation:
Overall, this stainless steel sink drain replacement kit is a solid choice for homeowners looking to replace a worn-out or leaking sink drain. The durable construction, easy installation, and leak-free seal make it a worthwhile investment. However, be prepared for the challenges of tightening the nuts in the cramped space under the sink. We recommend this kit for DIY enthusiasts who are comfortable with basic plumbing tasks.
## Q&A: Addressing Your Sink Outlet Concerns
Here are some frequently asked questions (and expert answers) regarding leaking sink outlets:
1. **Q: How do I know if my leaking sink outlet is a DIY fix or needs a professional plumber?**
**A:** If the leak is minor and you’re comfortable with basic plumbing, a DIY fix is often possible. However, if the leak is severe, the pipes are corroded, or you’re unsure about any step of the process, it’s best to call a professional plumber.
2. **Q: What’s the best material for a sink outlet – metal or plastic?**
**A:** Metal outlets (brass or stainless steel) are generally more durable and resistant to corrosion than plastic outlets. However, plastic outlets are often less expensive and easier to install.
3. **Q: How often should I replace my sink outlet?**
**A:** The lifespan of a sink outlet depends on the material and usage. Metal outlets can last for 10-15 years, while plastic outlets may need to be replaced more frequently. Replace the outlet if you notice leaks, corrosion, or other signs of damage.
4. **Q: Can I use Teflon tape on sink outlet connections?**
**A:** Teflon tape is not typically used on sink outlet connections, as the connections rely on compression from washers and nuts. Plumber’s putty or silicone sealant is used to seal the sink flange to the sink basin.
5. **Q: My sink outlet is leaking even after replacing the washers. What could be the problem?**
**A:** If the outlet is still leaking after replacing the washers, the problem could be a damaged tailpiece, a corroded sink flange, or improper installation. Inspect all the parts carefully and make sure the connections are tight.
6. **Q: How do I prevent my sink outlet from leaking in the future?**
**A:** To prevent leaks, use high-quality materials, install the outlet properly, avoid harsh chemicals, and clean the drain regularly to prevent clogs.
7. **Q: Is it safe to use chemical drain cleaners to unclog a sink with a leaking outlet?**
**A:** Chemical drain cleaners can be corrosive and may damage the sink outlet, potentially worsening leaks. It’s best to use a drain snake or call a plumber to unclog the drain.
8. **Q: What is the purpose of plumber’s putty, and can I substitute it with something else?**
**A:** Plumber’s putty creates a watertight seal between the sink flange and the sink basin. Silicone sealant can be used as a substitute, but plumber’s putty is generally easier to work with.
9. **Q: My pop-up sink outlet is leaking. Is the repair process different?**
**A:** Pop-up sink outlets have more complex mechanisms, so the repair process may be slightly different. Consult the manufacturer’s instructions or call a plumber for assistance.
10. **Q: What are the signs of a deteriorating sink outlet that should prompt replacement before a leak even occurs?**
**A:** Signs include visible corrosion, mineral buildup, difficulty tightening connections, and a generally unstable or wobbly feel to the entire assembly. Addressing these issues preemptively can prevent future headaches.
## Conclusion: Mastering the Art of Fixing a Leaking Sink Outlet
Fixing a leaking sink outlet is a manageable task for most homeowners with the right tools and knowledge. By understanding the components, causes of leaks, and step-by-step repair process, you can confidently tackle this common plumbing problem. Remember to prioritize safety, use high-quality materials, and take your time to ensure a proper installation. The information provided in this guide should equip you with the expertise needed to address a leaking sink outlet effectively and prevent future issues.
We’ve covered everything from diagnosing the leak and gathering the necessary tools to disassembling, cleaning, and reassembling the sink outlet. We’ve also explored the advantages of a quality sink drain and reviewed a standard replacement kit. By following these guidelines, you can save money on professional plumbing services and enjoy a leak-free sink for years to come. Now that you know **how to fix leaking sink outlet** problems, you can maintain your plumbing with confidence!
We encourage you to share your experiences with fixing a leaking sink outlet in the comments below. Your insights can help other homeowners tackle this common plumbing problem. If you’re interested in further plumbing repairs, explore our advanced guide to drain cleaning and maintenance.
