How to Tighten a Faucet Handle: A Comprehensive Guide
A loose faucet handle is more than just an annoyance; it can lead to drips, wasted water, and eventually, higher water bills. Fortunately, learning how to tighten a faucet handle is a straightforward DIY project that most homeowners can tackle with basic tools and a little patience. This guide will walk you through the process, ensuring you can restore your faucet to its optimal function. Whether you’re dealing with a wobbly lever or a spinning knob, understanding the underlying mechanics and the right approach will save you time and money.
Why is My Faucet Handle Loose?
Before diving into how to tighten a faucet handle, it’s helpful to understand why handles become loose in the first place. Several factors can contribute:
- Wear and Tear: Over time, the constant use of the faucet can loosen screws and connections.
- Vibrations: The vibrations from water flowing through the pipes can gradually loosen components.
- Corrosion: Mineral deposits and corrosion can affect the internal parts of the faucet, making it difficult for handles to stay secure.
- Improper Installation: If the faucet wasn’t installed correctly initially, the handle may have always been prone to loosening.
Tools You’ll Need
Gathering the necessary tools beforehand will make the process of learning how to tighten a faucet handle much smoother. Here’s a list of essential items:
- Screwdrivers: Both Phillips head and flathead screwdrivers are usually needed.
- Adjustable Wrench: For tightening or loosening nuts.
- Allen Wrench Set: Some faucets use Allen screws.
- Penetrating Oil: To help loosen stubborn screws.
- Clean Cloth or Rag: To protect the faucet finish and wipe away any mess.
- Plumber’s Tape: For re-sealing connections if needed.
Step-by-Step Guide: How to Tighten a Faucet Handle
Step 1: Turn Off the Water Supply
Before you start any plumbing work, it’s crucial to turn off the water supply to the faucet. Locate the shut-off valves under the sink. There are typically two valves, one for hot water and one for cold. Turn both valves clockwise until they are completely closed. If you can’t find these valves, you may need to shut off the main water supply to your house.
Step 2: Identify the Faucet Type
Different types of faucets have different handle attachment mechanisms. Common types include:
- Single-Handle Faucets: These usually have a single lever that controls both hot and cold water.
- Double-Handle Faucets: These have separate handles for hot and cold water.
- Ball-Type Faucets: These use a ball valve and often have a single handle that moves in multiple directions.
- Cartridge Faucets: These use a cartridge to control water flow and temperature.
Identifying your faucet type is crucial because the approach to how to tighten a faucet handle will vary.
Step 3: Locate the Screw
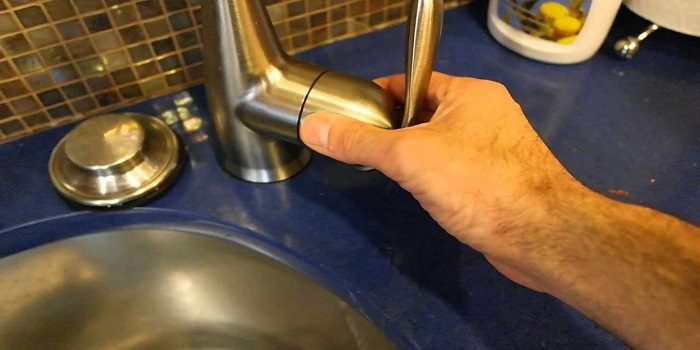
Most faucet handles are held in place by a screw. This screw is often hidden under a decorative cap or behind the handle itself. Look for a small cap on the top or front of the handle. Use a small flathead screwdriver or a knife to gently pry off the cap. Be careful not to scratch the faucet finish.
Step 4: Tighten the Screw
Once you’ve removed the cap, you should see a screw. Use the appropriate screwdriver (Phillips or flathead) to tighten the screw. Turn the screwdriver clockwise until the screw is snug. Avoid over-tightening, as this could strip the screw or damage the handle.
Step 5: Check for Movement
After tightening the screw, test the handle to see if it’s still loose. If it is, the screw may be stripped, or there may be another issue. If the screw is stripped, you may need to replace it with a new one of the same size and thread.
Step 6: Replace the Cap
If the handle is now secure, replace the decorative cap. Press it firmly into place. If the cap doesn’t stay in place, you may need to use a small amount of silicone sealant to hold it in place.
Step 7: Double-Handle Faucets
For double-handle faucets, repeat the process for both handles. Make sure to turn off both hot and cold water supplies before starting. Understanding how to tighten a faucet handle on both sides ensures consistent water flow and prevents future leaks.
Step 8: Single-Handle Faucets
Single-handle faucets might require a slightly different approach. Some have a set screw on the side of the handle that needs to be tightened with an Allen wrench. Others might have a cartridge that needs to be replaced. [See also: Replacing a Faucet Cartridge] Refer to the manufacturer’s instructions for specific guidance.
Step 9: When to Replace the Faucet
Sometimes, simply tightening the handle isn’t enough. If the faucet is old, corroded, or severely damaged, it may be more cost-effective to replace it entirely. Signs that it’s time for a replacement include:
- Constant Leaks: If the faucet continues to leak even after repairs, it may be time to replace it.
- Severe Corrosion: If the faucet is heavily corroded, it can be difficult to repair.
- Difficulty Finding Parts: If the faucet is old, it may be difficult to find replacement parts.
Troubleshooting Common Issues
Even with careful attention, you might encounter some common issues while learning how to tighten a faucet handle:
- Stripped Screws: If the screw is stripped, try using a rubber band or steel wool to create a tighter grip. Alternatively, replace the screw.
- Corroded Screws: If the screw is corroded, soak it in penetrating oil for a few hours before attempting to remove it.
- Stuck Handles: If the handle is stuck, gently tap it with a rubber mallet to loosen it.
- Water Leaks: If the faucet leaks after tightening the handle, check the O-rings and washers. They may need to be replaced. [See also: Replacing Faucet Washers]
Preventive Maintenance
To prevent faucet handles from loosening in the future, consider these preventive measures:
- Regularly Check Screws: Periodically check the screws on your faucet handles and tighten them as needed.
- Use Silicone Grease: Apply silicone grease to the faucet stem and cartridge to keep them lubricated.
- Avoid Over-Tightening: Over-tightening screws and handles can damage the faucet.
- Install a Water Softener: If you have hard water, consider installing a water softener to reduce mineral buildup.
Safety Precautions
When working on plumbing projects, always prioritize safety:
- Wear Safety Glasses: Protect your eyes from debris.
- Use Gloves: Protect your hands from sharp edges and chemicals.
- Turn Off the Power: If you’re working near electrical components, turn off the power to the circuit.
Conclusion
Learning how to tighten a faucet handle is a simple yet valuable skill for any homeowner. By following these steps and taking preventive measures, you can keep your faucets in good working order and avoid costly repairs. Remember to always turn off the water supply before starting any plumbing work and to consult a professional if you’re unsure about any step. With a little effort, you can easily tighten a loose faucet handle and enjoy a drip-free, functional faucet.
By understanding the mechanics of your faucet and following the steps outlined in this guide, you can confidently address a loose handle and maintain your plumbing fixtures effectively. Addressing a wobbly handle promptly prevents further damage and ensures your faucet operates efficiently. So, next time you notice a loose faucet handle, you’ll know exactly how to tighten a faucet handle and restore it to its proper function.
Don’t underestimate the importance of a well-maintained faucet. A small task like tightening a handle can save you from bigger plumbing problems down the line. Now that you know how to tighten a faucet handle, you’re equipped to handle this common household repair with ease.
