How to Fix a Leaky Faucet in the Kitchen with Easy DIY Solutions
Tired of that incessant drip, drip, drip coming from your kitchen faucet? A leaky faucet isn’t just annoying; it’s also wasting water and money. Fortunately, **how to fix a leaky faucet in the kitchen with easy diy solutions** is a common household task that most homeowners can tackle themselves. This comprehensive guide will walk you through the process step-by-step, providing expert insights, troubleshooting tips, and essential safety precautions to ensure a successful repair. We’ll cover everything from identifying the type of faucet to replacing worn-out parts, saving you the cost of a plumber and giving you the satisfaction of a job well done. This guide goes beyond the basics, offering insights gleaned from years of experience helping homeowners fix their leaky faucets. We’ll equip you with the knowledge and confidence to not only stop the leak but also understand the inner workings of your faucet.
Understanding the Problem: Why is Your Kitchen Faucet Leaking?
Before diving into the repair, it’s crucial to understand why your faucet is leaking. This will help you diagnose the problem accurately and choose the right solution. Common causes include:
* **Worn-Out Washers:** These rubber or plastic rings create a watertight seal. Over time, they can become brittle, cracked, or worn down, leading to leaks.
* **Damaged O-Rings:** O-rings are small, circular seals that prevent leaks around the faucet handle and spout. They can deteriorate over time due to friction and exposure to water.
* **Corroded Valve Seats:** The valve seat is the point where the water supply connects to the faucet body. Corrosion can create an uneven surface, preventing a tight seal.
* **Loose Parts:** Sometimes, a simple tightening of loose nuts or screws can resolve a leak.
* **High Water Pressure:** Excessive water pressure can put stress on faucet components, causing them to wear out faster.
* **Mineral Buildup:** Hard water can leave mineral deposits that interfere with the faucet’s moving parts and seals.
Understanding the cause of the leak is the first step in **how to fix a leaky faucet in the kitchen with easy diy solutions**.
Identifying Your Faucet Type: A Crucial First Step
Different faucet types require different repair approaches. Here’s an overview of the most common kitchen faucet types:
* **Compression Faucets:** These are the oldest type of faucet, characterized by two separate handles for hot and cold water. They use washers to control the water flow.
* **Ball Faucets:** These faucets have a single handle that controls both the water flow and temperature. They use a ball valve with slots and seals to regulate water flow.
* **Cartridge Faucets:** Similar to ball faucets, cartridge faucets have a single handle. They use a cartridge with internal seals to control water flow and temperature.
* **Ceramic Disc Faucets:** These are the most modern type of faucet, featuring a single lever and ceramic discs that slide across each other to control water flow. They are known for their durability and leak resistance.
Identifying your faucet type is critical because the parts and repair procedures vary significantly. For example, **how to fix a leaky faucet in the kitchen with easy diy solutions** for a compression faucet is very different from a ceramic disc faucet.
Essential Tools and Materials for Fixing a Leaky Faucet
Before you begin, gather the necessary tools and materials. Having everything on hand will make the repair process smoother and more efficient. Here’s a list of essentials:
* **Adjustable Wrench:** For loosening and tightening nuts and bolts.
* **Screwdrivers (Phillips and Flathead):** For removing handles and other components.
* **Pliers:** For gripping and manipulating small parts.
* **Allen Wrench Set:** For removing set screws on some faucet handles.
* **Basin Wrench:** For reaching nuts that are difficult to access with a regular wrench.
* **Penetrating Oil:** To loosen corroded parts.
* **White Vinegar:** For removing mineral deposits.
* **New Washers, O-Rings, and Cartridges:** Purchase a faucet repair kit that matches your faucet type.
* **Plumber’s Grease:** To lubricate faucet parts and prevent corrosion.
* **Clean Rags or Sponges:** To clean up spills and wipe down parts.
* **Bucket:** To catch any remaining water in the pipes.
* **Safety Glasses:** To protect your eyes from debris.
* **Work Gloves:** To protect your hands.
Having the right tools is half the battle when it comes to **how to fix a leaky faucet in the kitchen with easy diy solutions**. A well-stocked toolbox will make the job easier and safer.
Step-by-Step Guide: How to Fix a Leaky Compression Faucet
Compression faucets are relatively simple to repair. Follow these steps to fix a leaky compression faucet:
1. **Turn Off the Water Supply:** Locate the shut-off valves under the sink and turn them clockwise to stop the water flow. If you don’t have shut-off valves, you’ll need to turn off the main water supply to your house.
2. **Protect the Sink:** Place a towel or mat in the sink to protect it from scratches and dents.
3. **Remove the Faucet Handles:** Use a screwdriver to remove the screws holding the handles in place. Gently pull the handles off.
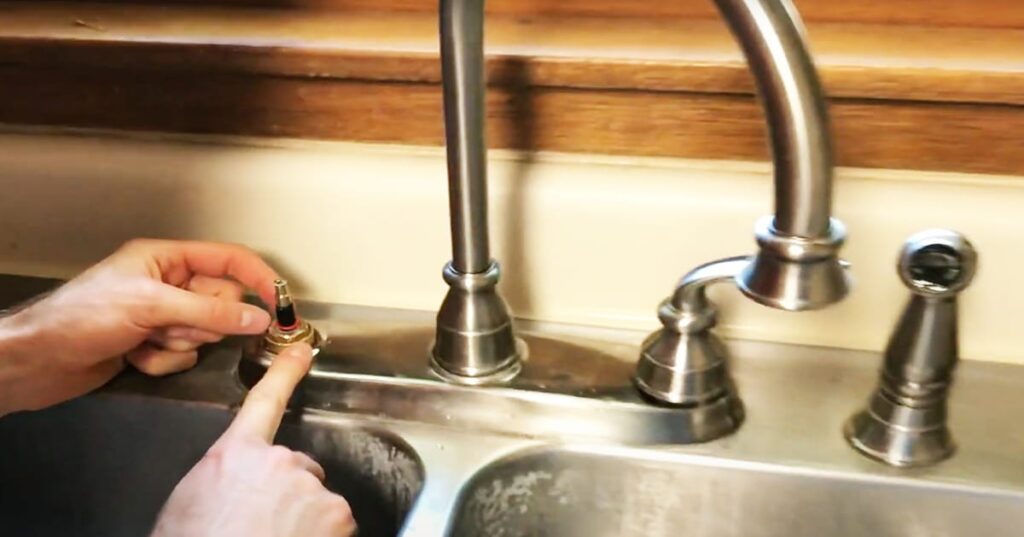
4. **Remove the Packing Nut:** Use an adjustable wrench to loosen and remove the packing nut that holds the valve stem in place.
5. **Remove the Valve Stem:** Carefully pull the valve stem out of the faucet body.
6. **Replace the Washer:** At the bottom of the valve stem, you’ll find a rubber washer. Remove the old washer and replace it with a new one.
7. **Inspect the Valve Seat:** Examine the valve seat inside the faucet body. If it’s corroded, use a valve seat wrench to remove and replace it. Alternatively, you can use a valve seat grinding tool to smooth out the surface.
8. **Replace the O-Rings:** Inspect the valve stem for O-rings. If they are worn or damaged, replace them with new ones.
9. **Apply Plumber’s Grease:** Apply a thin layer of plumber’s grease to the valve stem and O-rings.
10. **Reassemble the Faucet:** Reinsert the valve stem into the faucet body, tighten the packing nut, and reattach the handles.
11. **Turn On the Water Supply:** Slowly turn on the water supply and check for leaks. If the faucet is still leaking, double-check the washer and valve seat.
This detailed guide provides a clear understanding of **how to fix a leaky faucet in the kitchen with easy diy solutions** specifically for compression faucets.
Step-by-Step Guide: How to Fix a Leaky Ball Faucet
Ball faucets are more complex than compression faucets, but still manageable for the average DIYer. Here’s how to fix a leaky ball faucet:
1. **Turn Off the Water Supply:** As with compression faucets, start by turning off the water supply to the faucet.
2. **Loosen the Set Screw:** Locate the set screw on the side of the faucet handle. Use an Allen wrench to loosen the set screw and remove the handle.
3. **Loosen the Cap and Collar:** Use an adjustable wrench to loosen the cap and collar that hold the ball valve in place.
4. **Remove the Ball Valve:** Carefully lift the ball valve out of the faucet body. Inspect it for damage or wear.
5. **Replace the Seats and Springs:** Underneath the ball valve, you’ll find the seats and springs. Use a small screwdriver or pliers to remove the old seats and springs and replace them with new ones.
6. **Replace the O-Rings:** Inspect the faucet body for O-rings. If they are worn or damaged, replace them with new ones.
7. **Apply Plumber’s Grease:** Apply a thin layer of plumber’s grease to the ball valve, seats, springs, and O-rings.
8. **Reassemble the Faucet:** Reinsert the ball valve into the faucet body, tighten the cap and collar, and reattach the handle.
9. **Turn On the Water Supply:** Slowly turn on the water supply and check for leaks. If the faucet is still leaking, double-check the seats, springs, and O-rings.
Mastering **how to fix a leaky faucet in the kitchen with easy diy solutions** for ball faucets requires patience and attention to detail. Make sure to replace all the worn parts for a lasting repair.
Step-by-Step Guide: How to Fix a Leaky Cartridge Faucet
Cartridge faucets are known for their ease of repair. Here’s how to fix a leaky cartridge faucet:
1. **Turn Off the Water Supply:** As always, start by turning off the water supply to the faucet.
2. **Remove the Handle:** Depending on the model, the handle may be held in place by a set screw or a decorative cap. Remove the set screw or cap and pull the handle off.
3. **Remove the Retaining Clip:** Use pliers to remove the retaining clip that holds the cartridge in place.
4. **Pull Out the Cartridge:** Grasp the cartridge firmly and pull it straight up and out of the faucet body. You may need to wiggle it gently to loosen it.
5. **Replace the Cartridge:** Insert the new cartridge into the faucet body, making sure it’s properly aligned.
6. **Reinstall the Retaining Clip:** Reinstall the retaining clip to secure the cartridge in place.
7. **Reattach the Handle:** Reattach the handle and tighten the set screw or replace the decorative cap.
8. **Turn On the Water Supply:** Slowly turn on the water supply and check for leaks. If the faucet is still leaking, make sure the cartridge is properly seated.
**How to fix a leaky faucet in the kitchen with easy diy solutions** for cartridge faucets is often as simple as replacing the cartridge itself. This makes it a popular choice for homeowners.
Step-by-Step Guide: How to Fix a Leaky Ceramic Disc Faucet
Ceramic disc faucets are generally very reliable, but they can still leak occasionally. Here’s how to fix a leaky ceramic disc faucet:
1. **Turn Off the Water Supply:** Begin by turning off the water supply to the faucet.
2. **Remove the Handle:** The handle is usually held in place by a set screw or a decorative cap. Remove the set screw or cap and pull the handle off.
3. **Remove the Escutcheon Cap:** Use a wrench or pliers to remove the escutcheon cap, which covers the ceramic disc cartridge.
4. **Remove the Ceramic Disc Cylinder:** Carefully lift the ceramic disc cylinder out of the faucet body. Inspect it for cracks or damage.
5. **Clean the Seals:** Clean the rubber seals on the bottom of the cylinder with a soft cloth. You can also soak them in white vinegar to remove mineral deposits.
6. **Replace the Seals (If Necessary):** If the seals are damaged or worn, replace them with new ones.
7. **Reassemble the Faucet:** Reinsert the ceramic disc cylinder into the faucet body, replace the escutcheon cap, and reattach the handle.
8. **Turn On the Water Supply:** Slowly turn on the water supply and check for leaks. If the faucet is still leaking, double-check the seals and the cylinder for damage.
While ceramic disc faucets are durable, knowing **how to fix a leaky faucet in the kitchen with easy diy solutions** for this type can save you from costly repairs.
Troubleshooting Common Leaky Faucet Problems
Even with the best instructions, you might encounter some unexpected challenges. Here are some common problems and how to solve them:
* **Problem: The faucet is leaking from the base.**
* **Solution:** This is often caused by worn-out O-rings. Replace the O-rings on the faucet body.
* **Problem: The faucet is leaking from the handle.**
* **Solution:** This could be due to a loose packing nut or worn-out O-rings on the valve stem or cartridge. Tighten the packing nut or replace the O-rings.
* **Problem: The faucet is dripping constantly, even when turned off tightly.**
* **Solution:** This is usually caused by a worn-out washer or a damaged valve seat in a compression faucet. Replace the washer or valve seat.
* **Problem: I can’t remove a corroded nut or screw.**
* **Solution:** Apply penetrating oil to the nut or screw and let it sit for a few minutes. Then, try again with a wrench or screwdriver. If it’s still stuck, you may need to use a nut splitter or a screw extractor.
* **Problem: The new parts don’t fit my faucet.**
* **Solution:** Make sure you’re using the correct parts for your faucet type. Take the old parts with you to the hardware store to ensure you get the right replacements.
These troubleshooting tips will help you navigate the complexities of **how to fix a leaky faucet in the kitchen with easy diy solutions**.
Preventing Future Leaks: Maintenance Tips
Prevention is always better than cure. Here are some tips to help you prevent future leaks:
* **Regularly Inspect Your Faucets:** Check your faucets for leaks at least once a month. The sooner you catch a leak, the easier it will be to fix.
* **Replace Worn Parts Promptly:** Don’t wait until a faucet is leaking to replace worn parts. Replace washers, O-rings, and cartridges as soon as you notice signs of wear.
* **Clean Your Faucets Regularly:** Clean your faucets with a mild detergent and water to remove mineral deposits and prevent corrosion.
* **Lubricate Moving Parts:** Apply plumber’s grease to moving parts, such as valve stems and ball valves, to keep them lubricated and prevent wear.
* **Control Water Pressure:** If your water pressure is too high, install a pressure regulator to protect your faucets and other plumbing fixtures.
By following these maintenance tips, you can significantly reduce the likelihood of future leaks and extend the life of your faucets. This contributes to the overall efficiency of **how to fix a leaky faucet in the kitchen with easy diy solutions**.
When to Call a Plumber: Recognizing Your Limits
While many faucet repairs are DIY-friendly, there are times when it’s best to call a professional plumber. Consider calling a plumber if:
* You’re not comfortable working with plumbing.
* You’ve tried to fix the leak yourself, but it’s still leaking.
* The faucet is severely corroded or damaged.
* You’re dealing with a complex plumbing issue, such as a broken pipe.
* You don’t have the necessary tools or experience.
Knowing when to call a plumber is just as important as knowing **how to fix a leaky faucet in the kitchen with easy diy solutions**. Don’t hesitate to seek professional help if you’re unsure about any aspect of the repair.
Q&A: Expert Answers to Your Leaky Faucet Questions
**Q1: How much water can a leaky faucet waste?**
A: A faucet that drips just once per second can waste over 3,000 gallons of water per year. A steady stream can waste significantly more.
**Q2: Can I fix a leaky faucet without turning off the water?**
A: It’s strongly recommended to turn off the water supply before attempting any faucet repair. Working with live water lines can be dangerous and lead to flooding.
**Q3: What’s the best type of faucet for hard water?**
A: Ceramic disc faucets are generally more resistant to hard water buildup than other types of faucets due to their smooth, non-porous surfaces.
**Q4: How often should I replace my faucet washers?**
A: It depends on the quality of the washers and the frequency of faucet use. As a general rule, replace washers every 1-2 years or as soon as you notice signs of wear.
**Q5: Can I use Teflon tape on faucet parts?**
A: Teflon tape is typically used on threaded connections, such as pipe fittings. It’s not usually necessary for faucet repairs, but it can be helpful in sealing certain connections.
**Q6: What is the purpose of plumber’s grease?**
A: Plumber’s grease is a waterproof lubricant that helps to prevent corrosion and keep faucet parts moving smoothly. It’s essential for lubricating O-rings, valve stems, and other moving parts.
**Q7: How do I remove mineral deposits from my faucet?**
A: Soak the affected parts in white vinegar for several hours or overnight. The vinegar will dissolve the mineral deposits, making them easier to remove.
**Q8: Is it worth repairing a leaky faucet, or should I just replace it?**
A: In most cases, it’s worth repairing a leaky faucet, especially if it’s a relatively new or high-quality faucet. However, if the faucet is old, severely corroded, or constantly leaking, it may be more cost-effective to replace it.
**Q9: What are the signs of a failing faucet cartridge?**
A: Signs of a failing faucet cartridge include dripping, reduced water flow, and difficulty controlling water temperature.
**Q10: How do I find the right replacement parts for my faucet?**
A: The best way to find the right replacement parts is to take the old parts with you to the hardware store or plumbing supply store. You can also look up the faucet model number online to find a parts diagram.
These frequently asked questions provide further clarification on **how to fix a leaky faucet in the kitchen with easy diy solutions**.
Conclusion: Stop the Drip and Save!
Fixing a leaky faucet in your kitchen is a straightforward DIY project that can save you money on water bills and prevent further damage to your plumbing system. By following the steps outlined in this guide, you can confidently tackle this common household repair and enjoy the satisfaction of a job well done. Remember to identify your faucet type, gather the necessary tools and materials, and take your time to ensure a proper repair. With a little patience and effort, you can stop the drip and enjoy a leak-free kitchen faucet. We hope this comprehensive guide has given you the confidence to address **how to fix a leaky faucet in the kitchen with easy diy solutions**. For more advanced plumbing tips and tricks, explore our related articles or contact our expert team for personalized assistance. Share your experiences with fixing leaky faucets in the comments below!
