Find Leak in One Handle Kitchen Sink Faucet: Your Comprehensive Guide to Diagnosis and Repair
Is that persistent drip, drip, drip from your one-handle kitchen sink faucet driving you crazy and wasting water? You’re not alone. Finding a leak in a one-handle kitchen sink faucet is a common household problem, but with the right knowledge and a bit of DIY spirit, you can often diagnose and fix the issue yourself. This comprehensive guide provides expert insights, step-by-step instructions, and troubleshooting tips to help you pinpoint the source of the leak and restore your faucet to its leak-free glory. We’ll delve into the common causes of leaks, the tools you’ll need, and detailed repair procedures, ensuring a successful outcome. Our goal is to empower you with the knowledge to tackle this plumbing problem confidently, saving you money and preventing water damage.
Understanding the Anatomy of a One-Handle Kitchen Sink Faucet
Before you can effectively find leak in one handle kitchen sink faucet, it’s crucial to understand its inner workings. Unlike two-handle faucets, which control hot and cold water separately, a one-handle faucet uses a single lever to manage both temperature and flow. This lever operates a cartridge, ball valve, or ceramic disc, which mixes the hot and cold water to your desired temperature and controls the water pressure.
Common Types of One-Handle Faucets: Cartridge, Ball, and Ceramic Disc
- Cartridge Faucets: These faucets use a plastic or brass cartridge with O-rings that seal the water flow. Leaks often occur when these O-rings wear out or the cartridge becomes damaged. Cartridge faucets are known for their smooth operation and relatively easy repair.
- Ball Faucets: Ball faucets feature a slotted metal ball that controls the water flow. They have more parts than cartridge faucets, including springs, seats, and O-rings, making them slightly more complex to repair. Leaks in ball faucets often stem from worn-out springs or seats.
- Ceramic Disc Faucets: Ceramic disc faucets utilize two ceramic discs that slide over each other to control water flow. They are known for their durability and resistance to leaks. However, if they do leak, it’s often due to mineral buildup or damage to the ceramic discs.
How Water Flow is Controlled
Regardless of the type, all one-handle faucets work on the same basic principle: a single handle controls the mixing of hot and cold water. As you move the handle, it adjusts the position of the internal mechanism, allowing varying amounts of hot and cold water to flow through the spout. When the faucet is turned off, the mechanism completely blocks the water flow.
Diagnosing the Source of the Leak: A Step-by-Step Approach
Pinpointing the exact source of a leak is the first and most crucial step in the repair process. Here’s a systematic approach to help you find leak in one handle kitchen sink faucet:
1. Identifying the Leak Location
- Around the Base of the Faucet: This often indicates a problem with the O-rings or the faucet body itself. Mineral deposits and corrosion can also contribute to leaks in this area.
- From the Spout: A dripping spout usually points to a worn-out cartridge, ball valve, or ceramic disc. It could also be caused by sediment buildup affecting the seal.
- Under the Sink (Supply Lines): Check the connections between the supply lines and the faucet. Leaks here could be due to loose connections, damaged supply lines, or corroded fittings.
- From the Handle: A leak around the handle suggests a problem with the O-rings or the cartridge beneath the handle.
2. Checking for Visible Damage and Corrosion
Carefully inspect the faucet body, handle, and supply lines for any signs of visible damage, such as cracks, dents, or corrosion. Corrosion can weaken the metal and lead to leaks. Look for mineral buildup around joints and connections, as this can also indicate a leak.
3. Testing Water Pressure and Temperature
Sometimes, a leak can be exacerbated by high water pressure. Check your home’s water pressure using a pressure gauge. Excessive pressure can put strain on the faucet’s internal components. Also, test both hot and cold water to see if the leak is more pronounced with one temperature than the other. This can help you isolate the problem to a specific valve or supply line.
4. Drying the Area and Observing the Leak
Thoroughly dry the area around the faucet with a clean cloth. Then, carefully observe where the water is originating from. This can help you narrow down the potential causes of the leak. Use a flashlight to get a better view of hard-to-reach areas.
Essential Tools and Materials for Faucet Repair
Before you start any repairs, gather the necessary tools and materials. Having everything on hand will make the process smoother and more efficient.
- Adjustable Wrench: For loosening and tightening nuts and bolts.
- Basin Wrench: Specifically designed for reaching and loosening faucet nuts under the sink.
- Screwdrivers (Phillips and Flathead): For removing handles and other faucet components.
- Pliers: For gripping and manipulating small parts.
- Allen Wrench Set: For removing set screws on some faucet handles.
- Penetrating Oil: To loosen corroded nuts and bolts.
- Plumber’s Tape (Teflon Tape): For sealing threaded connections.
- Replacement Parts: Cartridges, O-rings, seats, and springs (depending on the faucet type and the source of the leak).
- Clean Cloths or Sponges: For cleaning and drying the area.
- Bucket: To catch any water that may spill during the repair.
- Safety Glasses: To protect your eyes from debris.
Step-by-Step Repair Guide for Common One-Handle Faucet Leaks
Once you’ve diagnosed the source of the leak and gathered your tools, you can proceed with the repair. Here’s a breakdown of the repair process for common types of one-handle faucets.
Repairing a Cartridge Faucet Leak
- Turn Off the Water Supply: Locate the shut-off valves under the sink and turn them clockwise to shut off the water supply to the faucet.
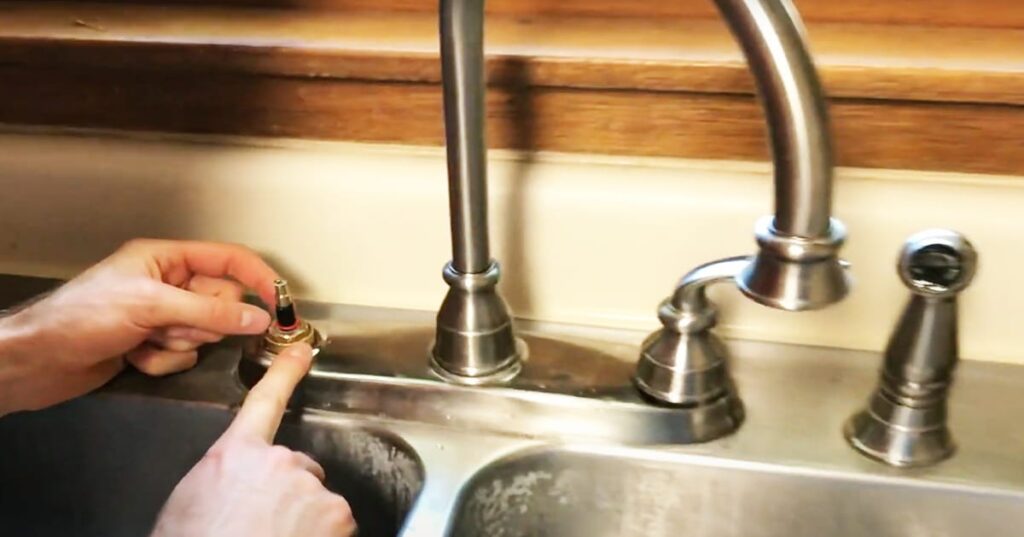
- Remove the Handle: Depending on the faucet model, you may need to use an Allen wrench to loosen a set screw on the side of the handle. Alternatively, some handles simply pull off after removing a decorative cap.
- Remove the Retaining Clip or Nut: Once the handle is removed, you’ll find a retaining clip or nut that holds the cartridge in place. Use pliers or a wrench to remove it.
- Pull Out the Cartridge: Gently pull the cartridge straight up and out of the faucet body. It may be a bit stiff, so use a rocking motion if needed.
- Inspect the Cartridge and O-Rings: Examine the cartridge for any signs of damage or wear. Check the O-rings for cracks or deterioration.
- Replace the Cartridge or O-Rings: If the cartridge is damaged, replace it with a new one. If the O-rings are worn, replace them with new ones of the same size.
- Reassemble the Faucet: Reinstall the cartridge, retaining clip or nut, and handle.
- Turn On the Water Supply: Slowly turn the water supply back on and check for leaks.
Repairing a Ball Faucet Leak
- Turn Off the Water Supply: As with the cartridge faucet, start by turning off the water supply under the sink.
- Remove the Handle: Remove the handle by loosening the set screw or pulling it off, depending on the model.
- Loosen the Cap and Collar: Use an adjustable wrench to loosen the cap and collar that hold the ball valve in place.
- Remove the Ball Valve: Lift the ball valve out of the faucet body.
- Inspect the Seats and Springs: Examine the seats and springs located beneath the ball valve. These are common sources of leaks in ball faucets.
- Replace the Seats and Springs: Replace the seats and springs with new ones.
- Reassemble the Faucet: Reinstall the ball valve, cap and collar, and handle.
- Turn On the Water Supply: Slowly turn the water supply back on and check for leaks.
Repairing a Ceramic Disc Faucet Leak
- Turn Off the Water Supply: Turn off the water supply under the sink.
- Remove the Handle: Remove the handle by loosening the set screw or pulling it off.
- Remove the Decorative Cap: Remove the decorative cap that covers the ceramic disc cartridge.
- Remove the Cartridge: Use a wrench to loosen and remove the ceramic disc cartridge.
- Inspect the Ceramic Discs: Examine the ceramic discs for any signs of damage or mineral buildup.
- Clean or Replace the Ceramic Discs: If the discs are simply dirty, clean them with a mild abrasive cleaner. If they are damaged, replace them with new ones.
- Reassemble the Faucet: Reinstall the cartridge, decorative cap, and handle.
- Turn On the Water Supply: Slowly turn the water supply back on and check for leaks.
Troubleshooting Common Issues and Preventing Future Leaks
Even with careful repair, you might encounter some challenges. Here are some troubleshooting tips:
- Tightening Connections: If you still see a leak after reassembling the faucet, try tightening the connections slightly. Be careful not to overtighten, as this can damage the parts.
- Using Plumber’s Tape: Apply plumber’s tape to threaded connections to ensure a tight seal. Wrap the tape clockwise around the threads.
- Checking for Mineral Buildup: Mineral buildup can interfere with the faucet’s operation and cause leaks. Clean the faucet components regularly with a vinegar solution to remove mineral deposits.
- Replacing Worn Parts: If a part is severely worn or damaged, replace it rather than trying to repair it.
Preventing Future Leaks
- Regular Maintenance: Inspect your faucet regularly for any signs of leaks or damage.
- Proper Installation: Ensure that the faucet is properly installed according to the manufacturer’s instructions.
- Water Softener: If you have hard water, consider installing a water softener to reduce mineral buildup.
- Avoid Abrasive Cleaners: Use mild, non-abrasive cleaners to clean your faucet. Abrasive cleaners can damage the finish and seals.
Choosing the Right Replacement Parts: A Guide
Selecting the correct replacement parts is essential for a successful repair. Always refer to the faucet manufacturer’s instructions or consult a plumbing professional to ensure you’re using the right parts.
Identifying the Faucet Model
Knowing the faucet model is crucial for finding compatible replacement parts. The model number is usually located on the faucet body or in the manufacturer’s documentation. If you can’t find the model number, try searching online using the faucet’s brand and style.
Matching Parts to Your Faucet Type
Ensure that the replacement parts you purchase are specifically designed for your faucet type (cartridge, ball, or ceramic disc). Using the wrong parts can damage the faucet or cause leaks.
Purchasing Quality Parts
Invest in high-quality replacement parts from reputable manufacturers. Cheap parts may not last as long and could lead to further problems.
When to Call a Professional Plumber
While many faucet leaks can be repaired DIY, some situations require the expertise of a professional plumber.
- Extensive Damage: If the faucet body is severely damaged or corroded, it may be necessary to replace the entire faucet.
- Complex Plumbing Issues: If you encounter complex plumbing issues, such as damaged pipes or faulty shut-off valves, it’s best to call a plumber.
- Lack of Experience: If you’re not comfortable working with plumbing, it’s always a good idea to hire a professional.
Leading Kitchen Faucet Brands Known for Quality
Several brands are renowned for producing high-quality kitchen faucets. These include:
- Kohler: Known for their innovative designs and durable construction.
- Delta: Offers a wide range of faucets with advanced features like Touch2O technology.
- Moen: Known for their reliability and lifetime warranties.
- American Standard: Offers a variety of faucets with classic and modern designs.
The Advantages of Fixing a Leaky Faucet Promptly
Addressing a leaky faucet promptly offers several significant advantages:
- Water Conservation: Even a small drip can waste gallons of water over time. Fixing the leak conserves water and reduces your water bill.
- Cost Savings: By reducing water waste, you’ll save money on your water bill.
- Preventing Water Damage: Leaks can cause water damage to your cabinets, floors, and walls.
- Avoiding Mold Growth: Excess moisture from leaks can promote mold growth, which can be harmful to your health.
- Maintaining Faucet Lifespan: Addressing leaks promptly can prevent further damage to the faucet and extend its lifespan.
Expert Q&A on One-Handle Kitchen Sink Faucet Leaks
- Question: What’s the most common reason for a one-handle kitchen faucet to leak from the spout?
- Answer: The most common culprit is a worn-out cartridge, ball valve, or ceramic disc. These components are responsible for sealing the water flow, and over time, they can deteriorate or become damaged, leading to drips.
- Question: How can I tell if the leak is coming from the hot or cold water side of the faucet?
- Answer: Turn off the hot water supply and see if the leak stops. If it does, the problem is likely on the hot water side. Repeat the process with the cold water supply to isolate the source.
- Question: Can I use any type of lubricant on the faucet components during reassembly?
- Answer: Yes, using a silicone-based plumber’s grease can help lubricate the components and prevent them from sticking or corroding. Avoid using petroleum-based lubricants, as they can damage rubber parts.
- Question: What should I do if I can’t remove a corroded nut or bolt?
- Answer: Apply penetrating oil to the corroded nut or bolt and let it sit for several minutes. Then, try loosening it with a wrench. If it’s still stuck, you may need to use a specialized nut splitter.
- Question: Is it necessary to replace the entire faucet if the handle is leaking?
- Answer: Not necessarily. A leaking handle is often caused by worn-out O-rings, which can be easily replaced. However, if the handle itself is damaged, you may need to replace it.
- Question: How often should I inspect my kitchen faucet for leaks?
- Answer: It’s a good practice to inspect your kitchen faucet for leaks at least once a month. Early detection can prevent minor problems from turning into major ones.
- Question: What’s the best way to clean mineral buildup from faucet components?
- Answer: Soak the components in a solution of equal parts vinegar and water for several hours. Then, scrub them with a soft brush to remove the mineral deposits.
- Question: Can high water pressure cause my faucet to leak?
- Answer: Yes, excessive water pressure can put strain on the faucet’s internal components and cause them to leak. If your water pressure is too high, consider installing a pressure regulator.
- Question: What type of plumber’s tape should I use for faucet repairs?
- Answer: Use Teflon tape, which is specifically designed for sealing threaded connections in plumbing applications.
- Question: Where can I find replacement parts for my specific faucet model?
- Answer: Check with the faucet manufacturer’s website or local plumbing supply stores. Be sure to have your faucet model number handy.
Conclusion: Taking Control of Your Faucet Leak
Finding and fixing a leak in a one-handle kitchen sink faucet might seem daunting at first, but with this comprehensive guide, you’re well-equipped to tackle the task. By understanding the faucet’s components, diagnosing the source of the leak, and following the step-by-step repair instructions, you can save water, money, and prevent potential water damage. Remember to prioritize safety by turning off the water supply before starting any repairs. If you encounter any challenges or feel uncomfortable with the process, don’t hesitate to call a professional plumber. Now that you are armed with expert knowledge on how to find leak in one handle kitchen sink faucet, consider sharing this guide with others who might benefit from it. Share your experiences with fixing leaky faucets in the comments below; your insights could help other homeowners! If you’re looking for more advanced plumbing tips and guides, explore our other resources.
